Cisco Catalyst 9800 Conversion Guide
Prerequisites
- Cisco IOS XE system must be running 17.9 or later.
- Guide assumes the network is using an on-prem 9800 Controller.
- Wi-Fi system has AP(s) linked to the 9800 WLC Controller.
- Cisco system has basic traffic routing working with existing SSID(s).
- An Intel-based host is required in the network to run the RadSecProxy container.
High Level Steps
- Deploy RadSecProxy container and record IP address of host
- Build WLAN Helium Passpoint SSID
- Build a RADIUS Server and Group
- Create a AAA Method List
- Add the NAS-ID to the WLAN AAA Policy
- Build Hotspot 2.0 Profile
- Build the Helium SSID
- Apply Policy and Hotspot Profile to the SSID
- Create Policy Tag
- Apply Tag to APs
Deploy RadSecProxy Container
RADIUS messages used for user authentication and session accounting are transmitted unsecured and over UDP by default. By directing these messages internally in your secure network to a RadSecProxy, the UDP traffic is then converted to a TLS-protected TCP connection to the Helium Network core AAA servers.
Prerequisites
- An Intel-based machine with Docker installed.
- The Intel-based machine has a private IP in your network reachable from your 9800 WLC Controller
- ACLs or firewalls allow the 9800 WLC Controller and Docker container to communicate over UDP on ports 1812 and 1813
- ACLs or firewalls allow the container/host to reach the internet on TCP ports 2083 and 3802.
Container Deployment
- Unzip and untar the
radsec-proxy-main.tar.gzfile into the directory of your choice on the host machine. This will unpack the following items:Dockerfile- The Docker instructions on how to build the containerradsecproxy.conf- The radsecproxy config file is pre-populated to connect to Helium Network AAA serversdocker-compose.yml- File to start and stop the container as a daemon.
tar -xvzf radsec-proxy-main.tar.gz
- Into the same directory, copy the 3 certificates obtained from the Helium Network
- ca.pem - the root CA certificate
- cert.pem - the user certificate
- key.pem - the key file matched to the certificate
- Start the container using:
sudo docker compose up -d
- If/when needed, stop the container using:
sudo docker compose down
Build Cisco 9800 Helium Passpoint SSID
The following steps will configure your Cisco 9800 WLC system to broadcast an SSID with the needed Passpoint and RADIUS configurations to support Helium Mobile user offload.
To start, log in to your Cisco 9800 Dashboard in your browser. This will be our starting point for all major steps below.
In the following steps we will only mention mandatory fields to set. Most windows will have many other parameters with default values set. Leave any unmentioned parameter at its default value.
Build a RADIUS Profile
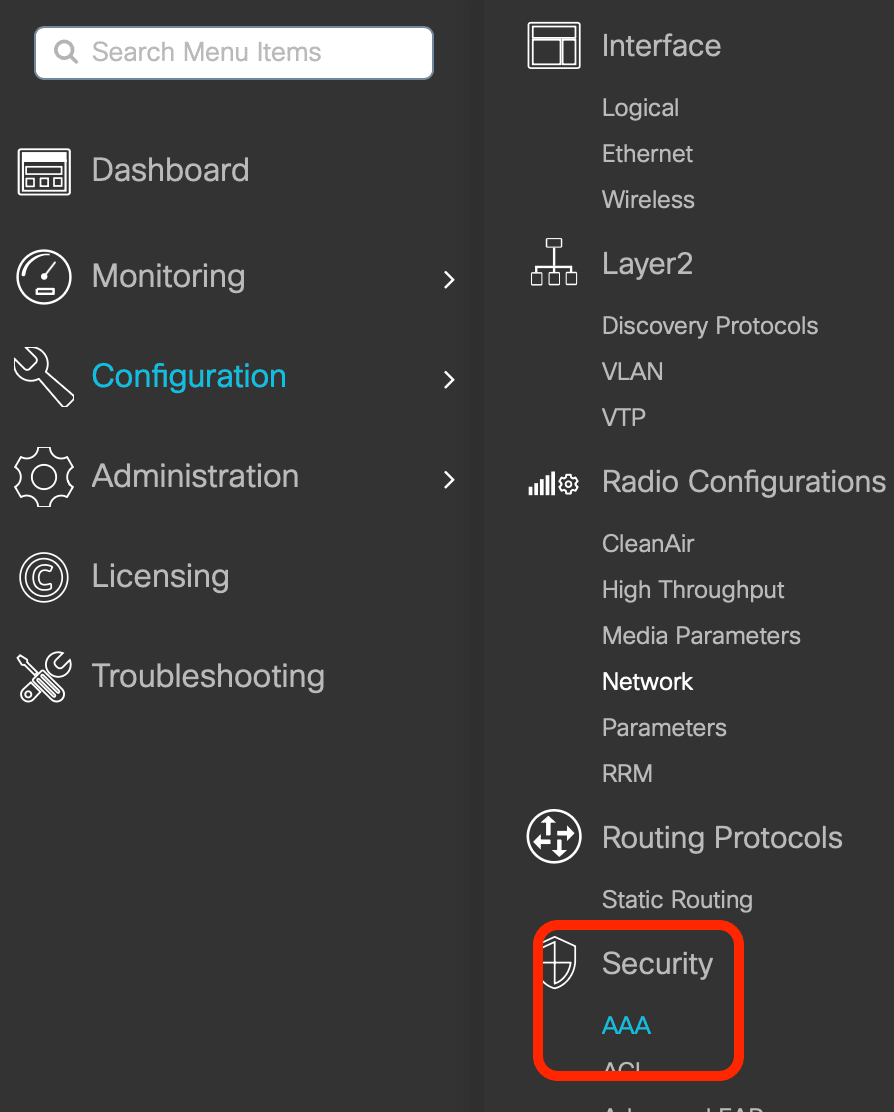
- Click on Configuration -> Security -> AAA in the left menu column
- Confirm RADIUS is selected in the left column and click +Add in the top left
- Enter a Name, e.g. Helium_AAA
- Enter a Server Address with the IP of the RadSecProxy you installed earlier.
- Enter the Key and Confirm Key fields equal to "mysecret" (modify if you have modified it during the RadSecProxy container installation)
- Confirm the Auth Port and Acct Port are 1812 and 1813 respectively
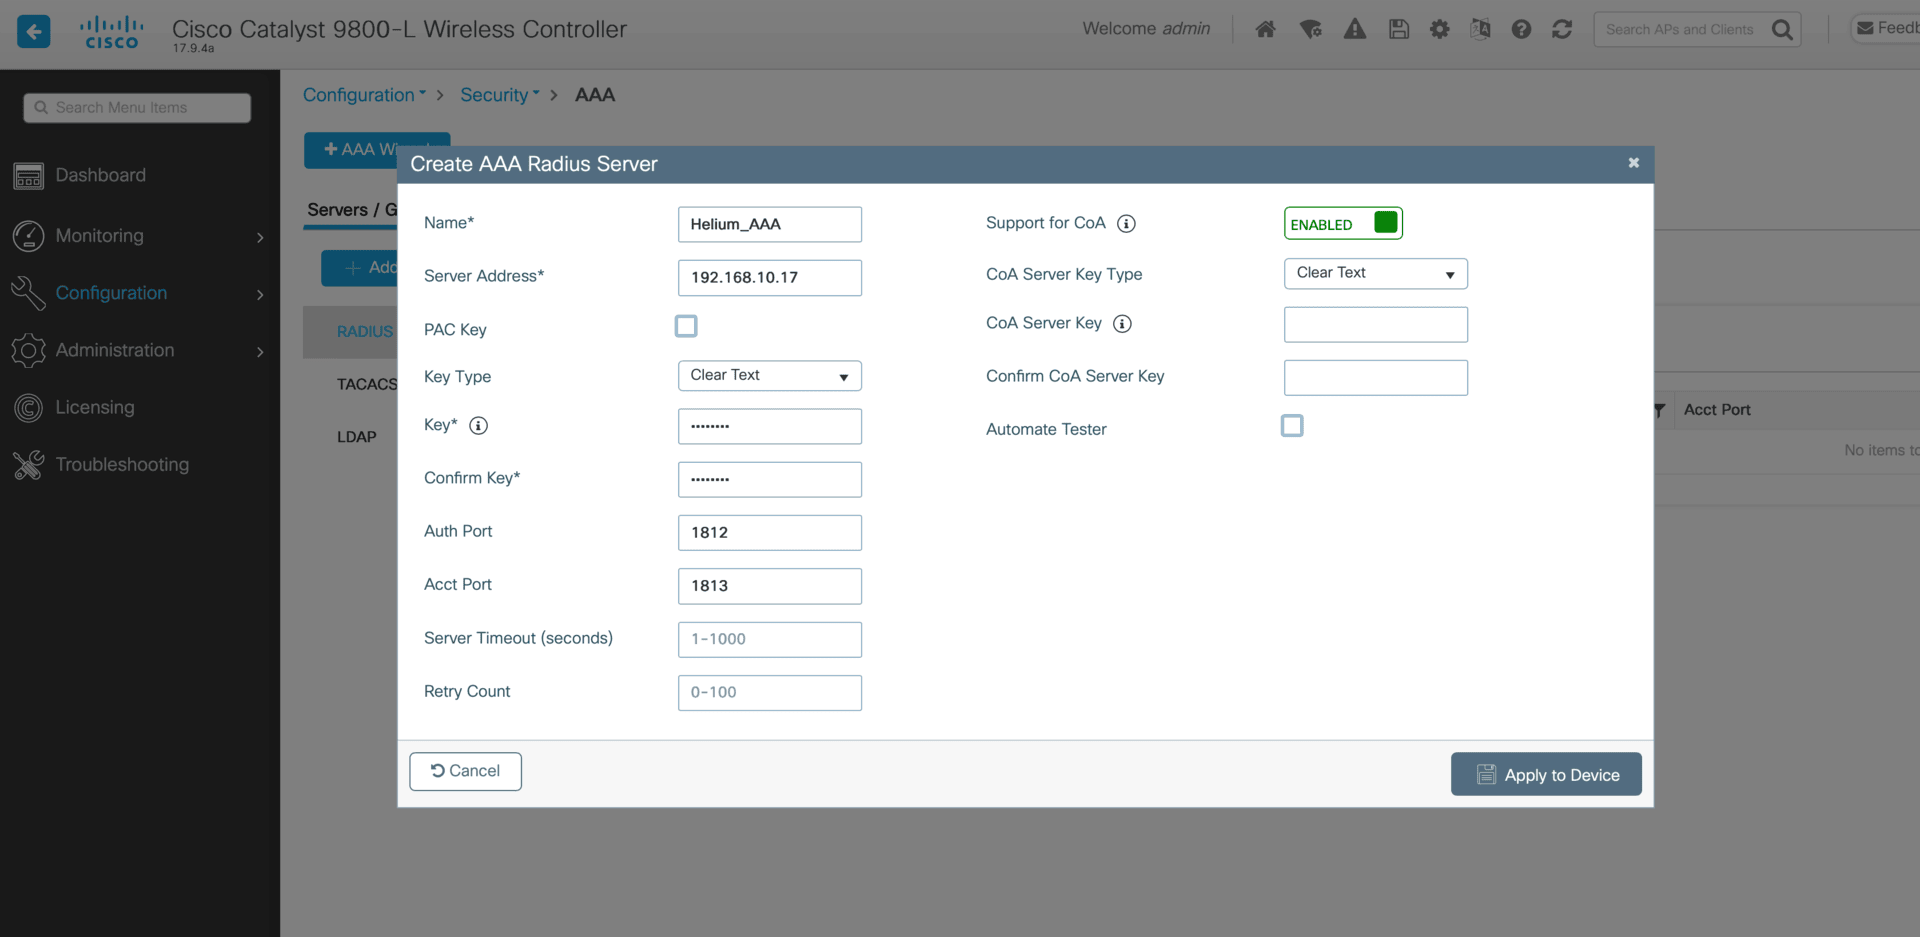
- Click Apply to Device
NOTE If you have installed multiple RadSecProxy instances for redundancy, repeat the server creation for each instance, incrementing the names with an integer, e.g. Helium_AAA_1
- Click on Server Group
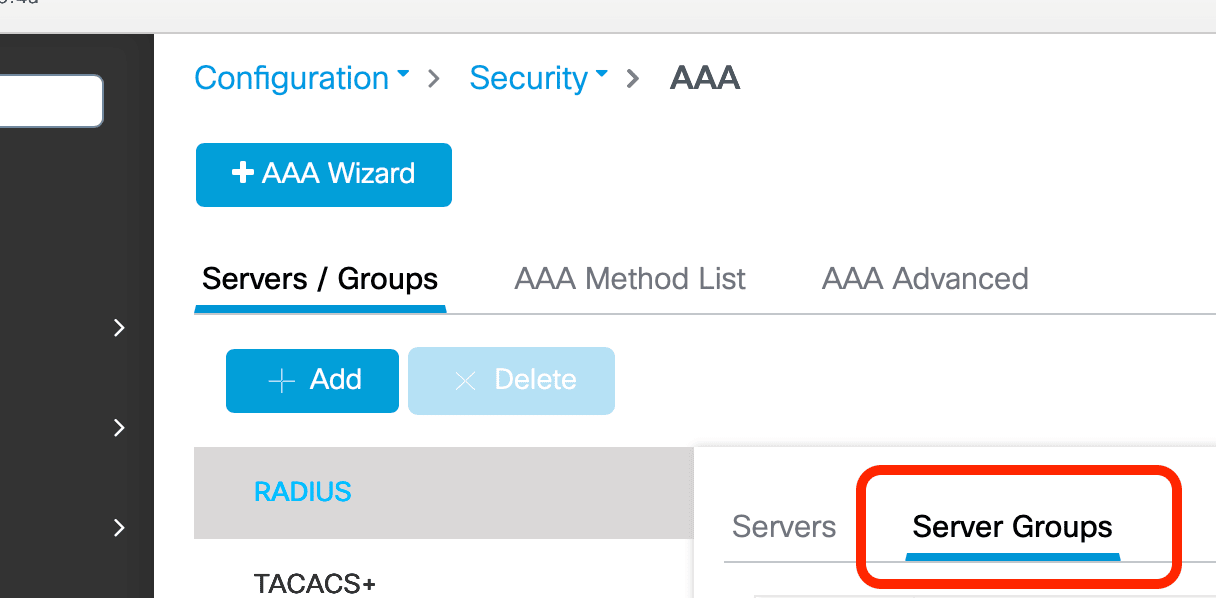
- Click on +Add
- Enter a Name, e.g. "Helium_svg"
- Select your AAA servers and use the arrows to move them into the Assigned Servers list
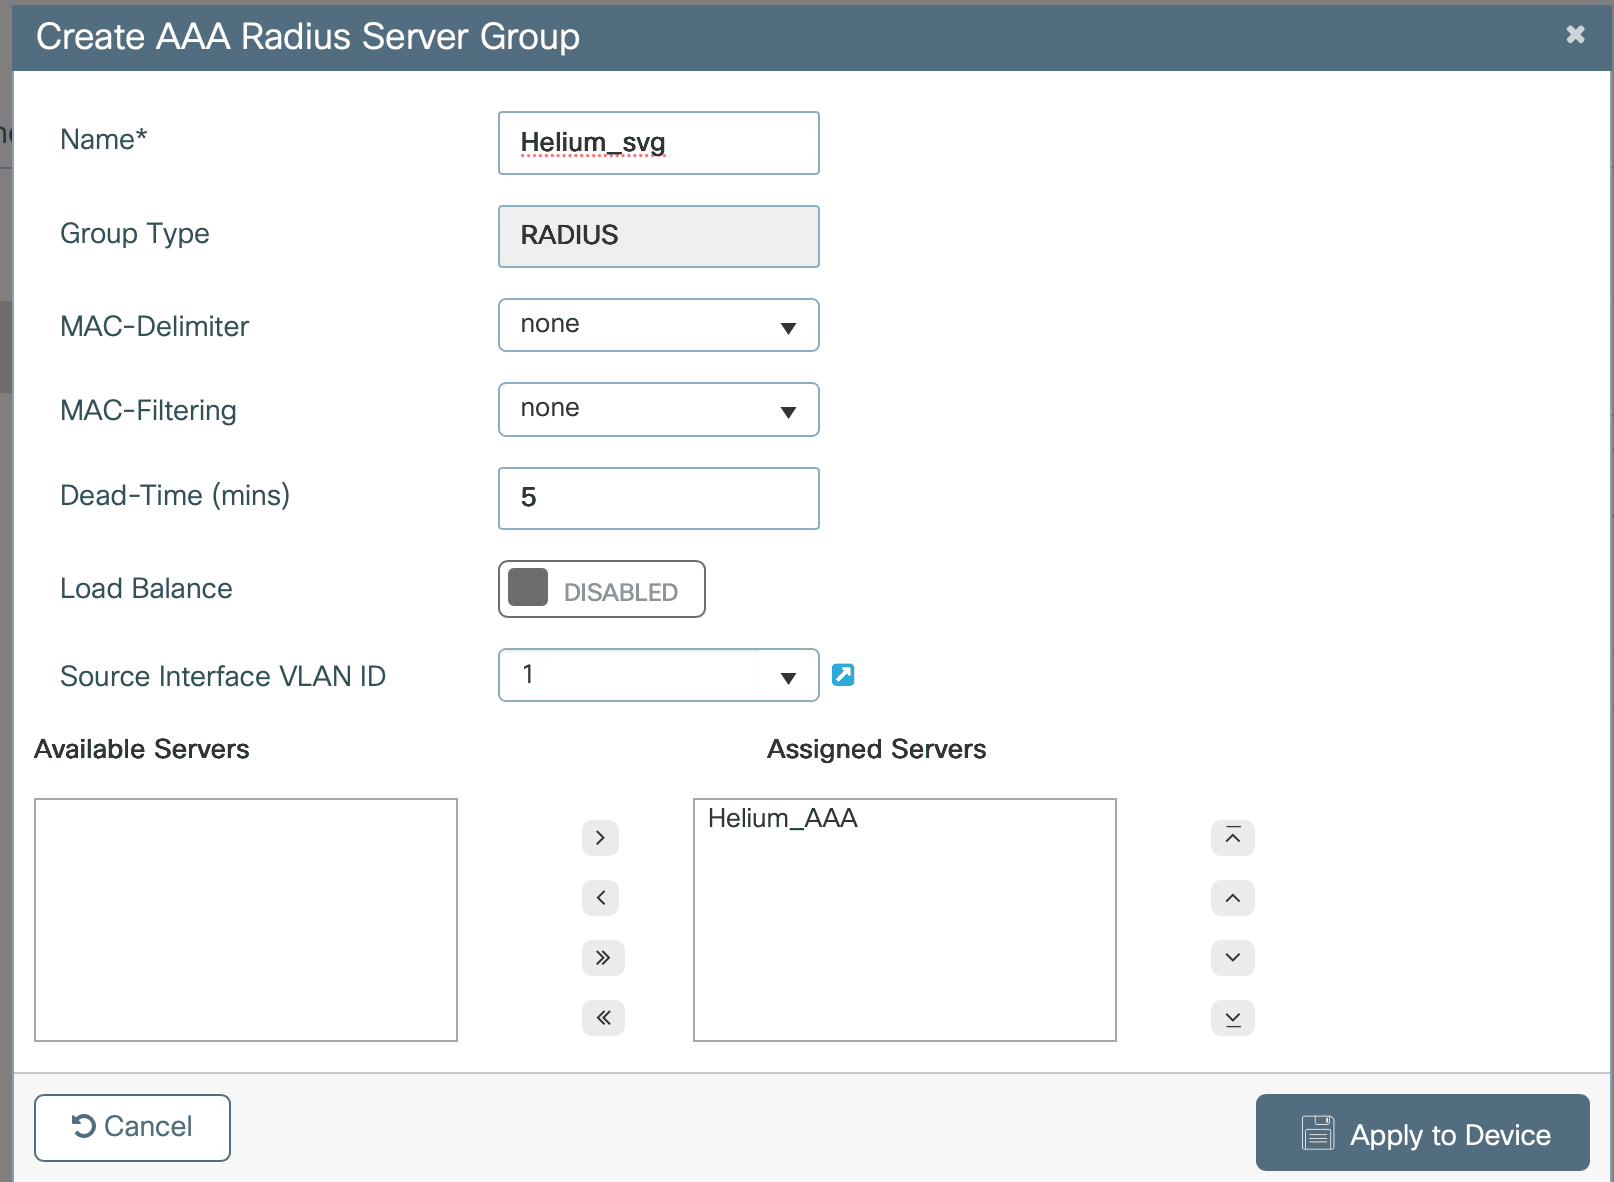
- Click Apply to Device
Create a AAA Method List
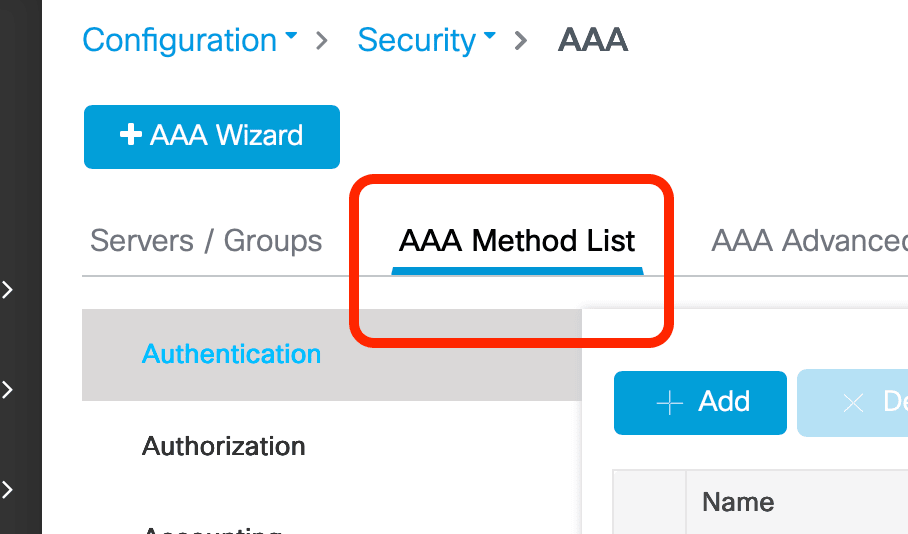
- Click AAA Method List
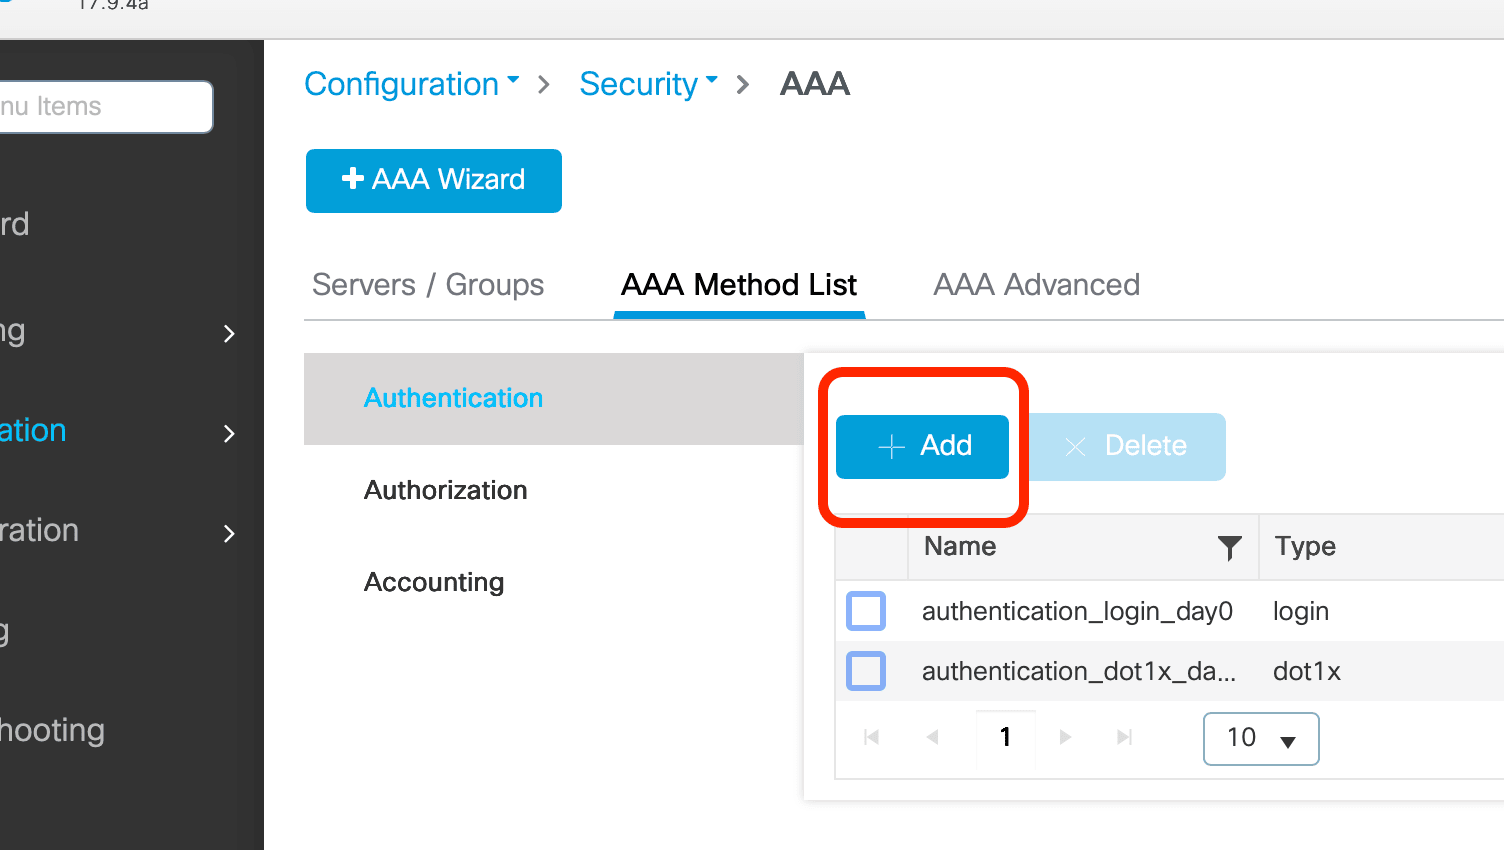
- Click +Add in the lower box
- Enter a Name, e.g. Helium-aaa-meth-list
- In Type dropdown select dot1x
- Select your Server Group in the list and use the arrows to move it to Assigned Server Groups
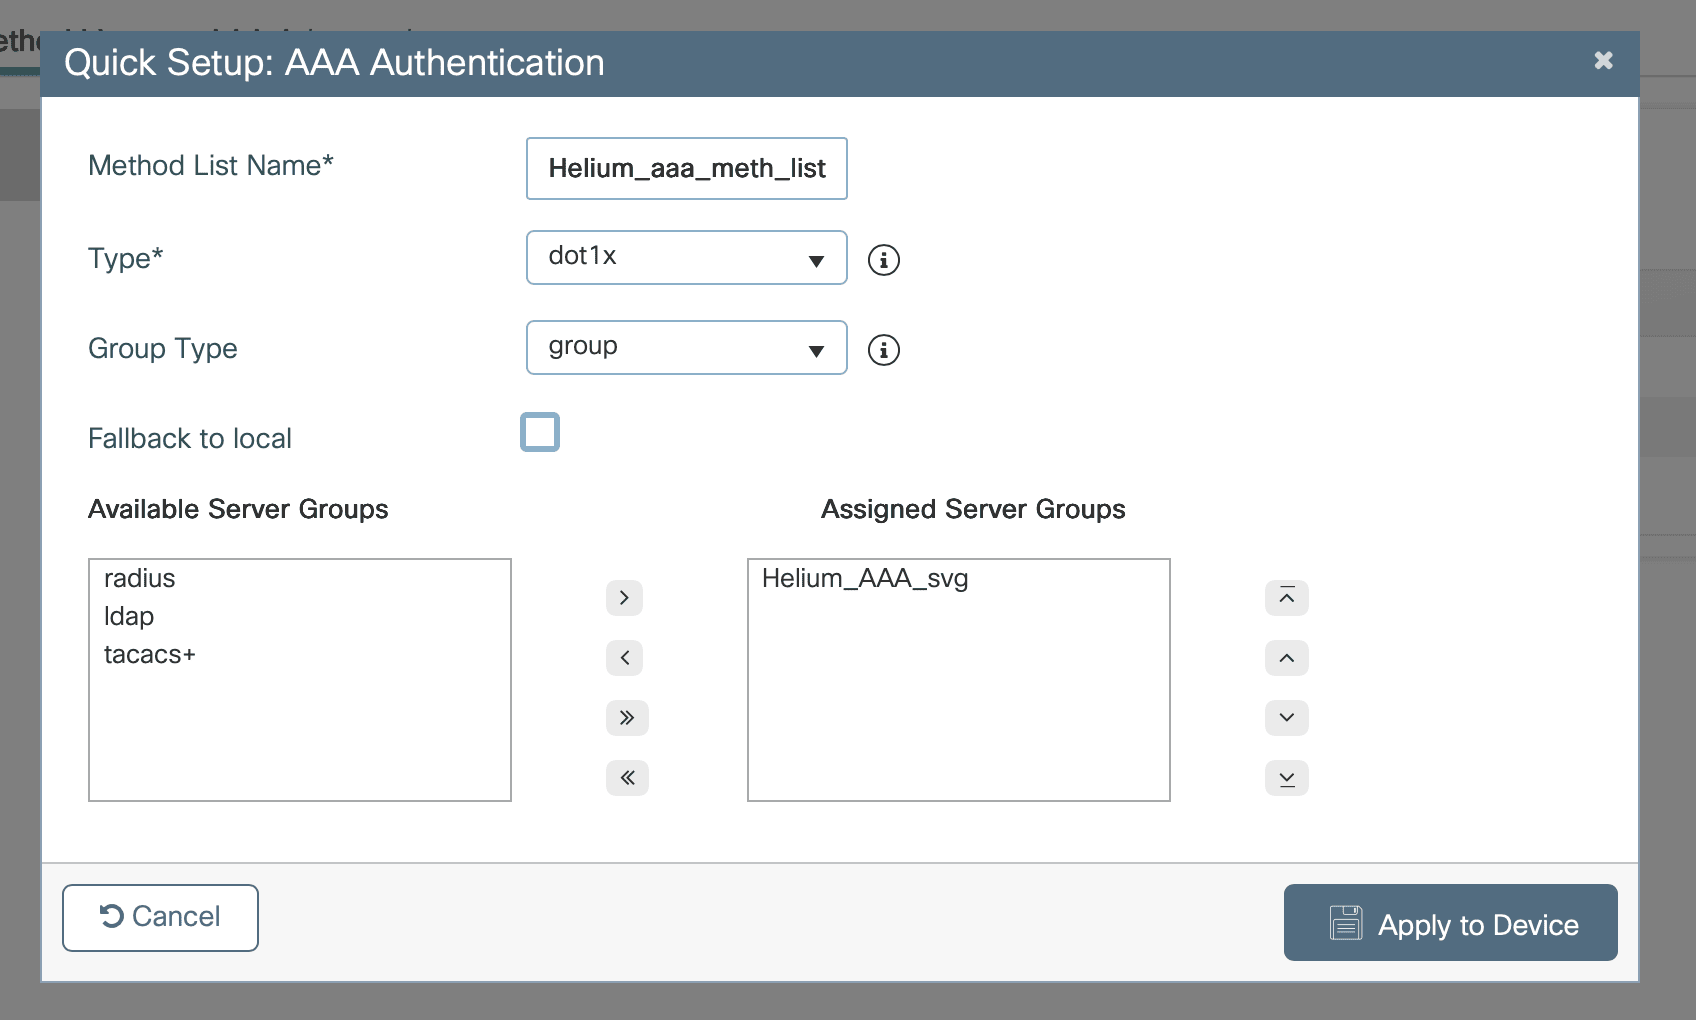
- Click Apply to Device
- From the left column select Accounting and then click +Add
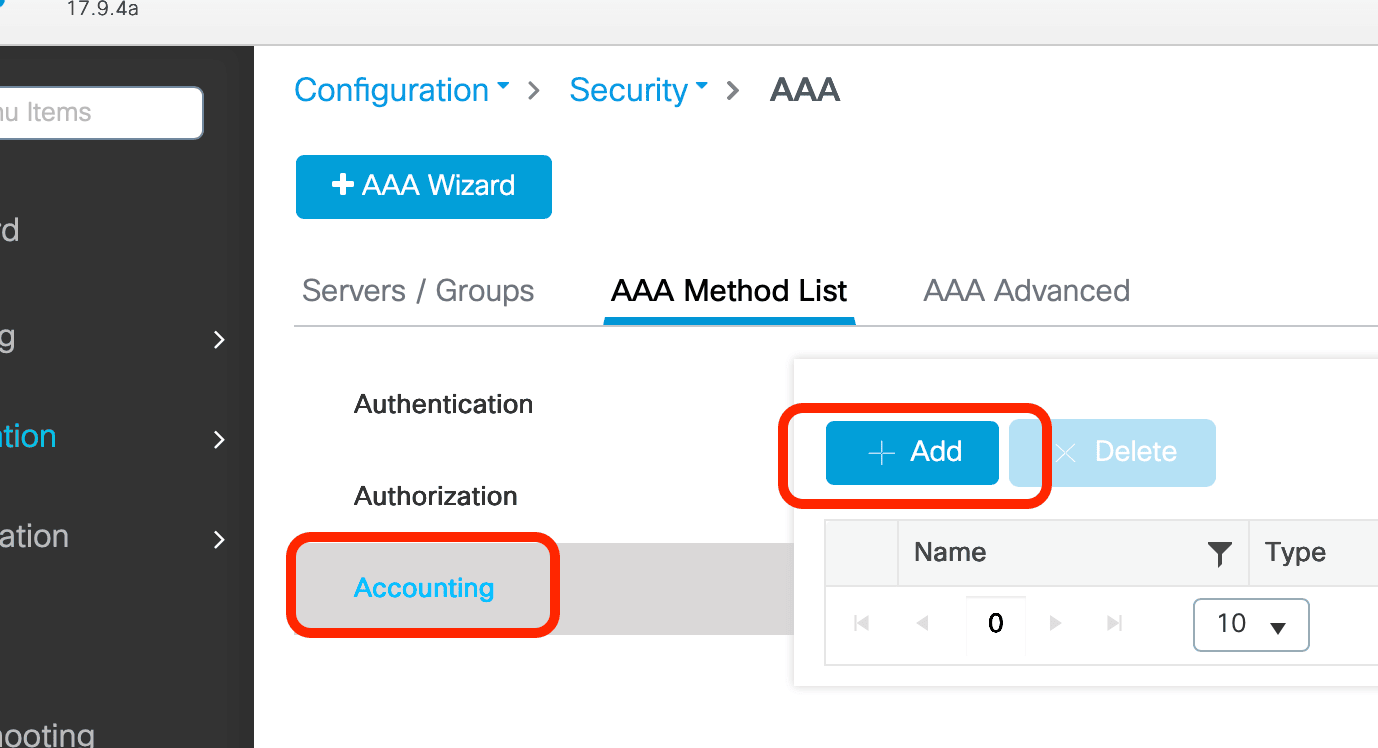
- In Method List Name enter Helium_meth_list_acct
- In the Type dropdown select Identity
- Select your Server Group and use the arrows to move it into the Assigned Server Group
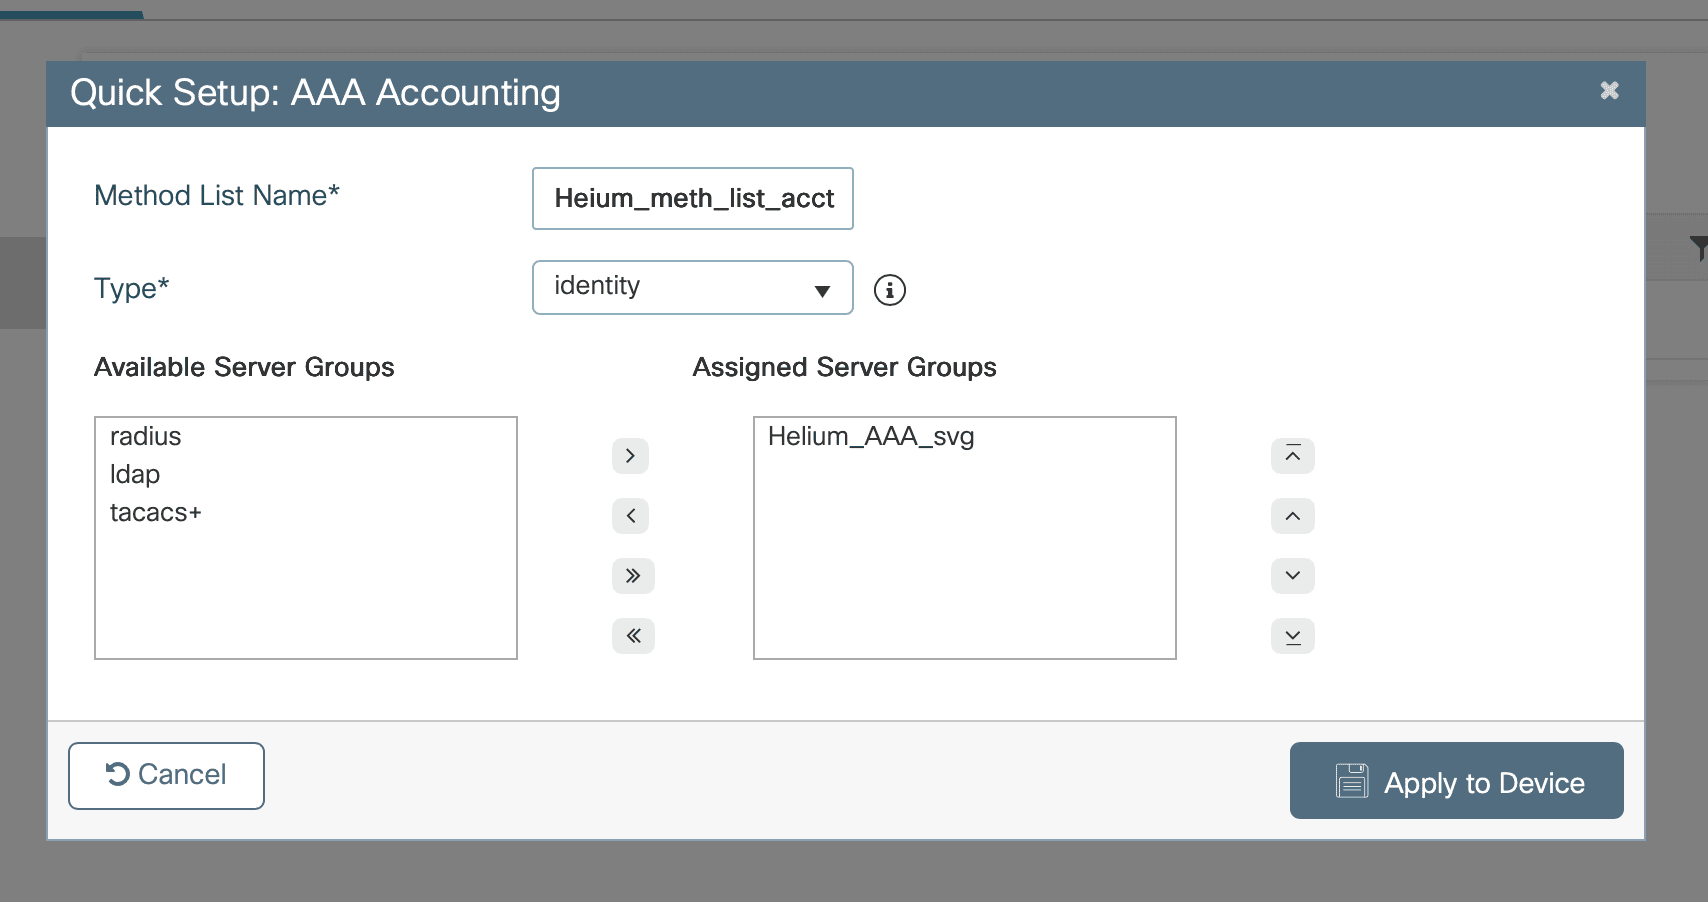
- Click Apply to Device
Add the NAS-ID to the WLAN AAA Policy
-
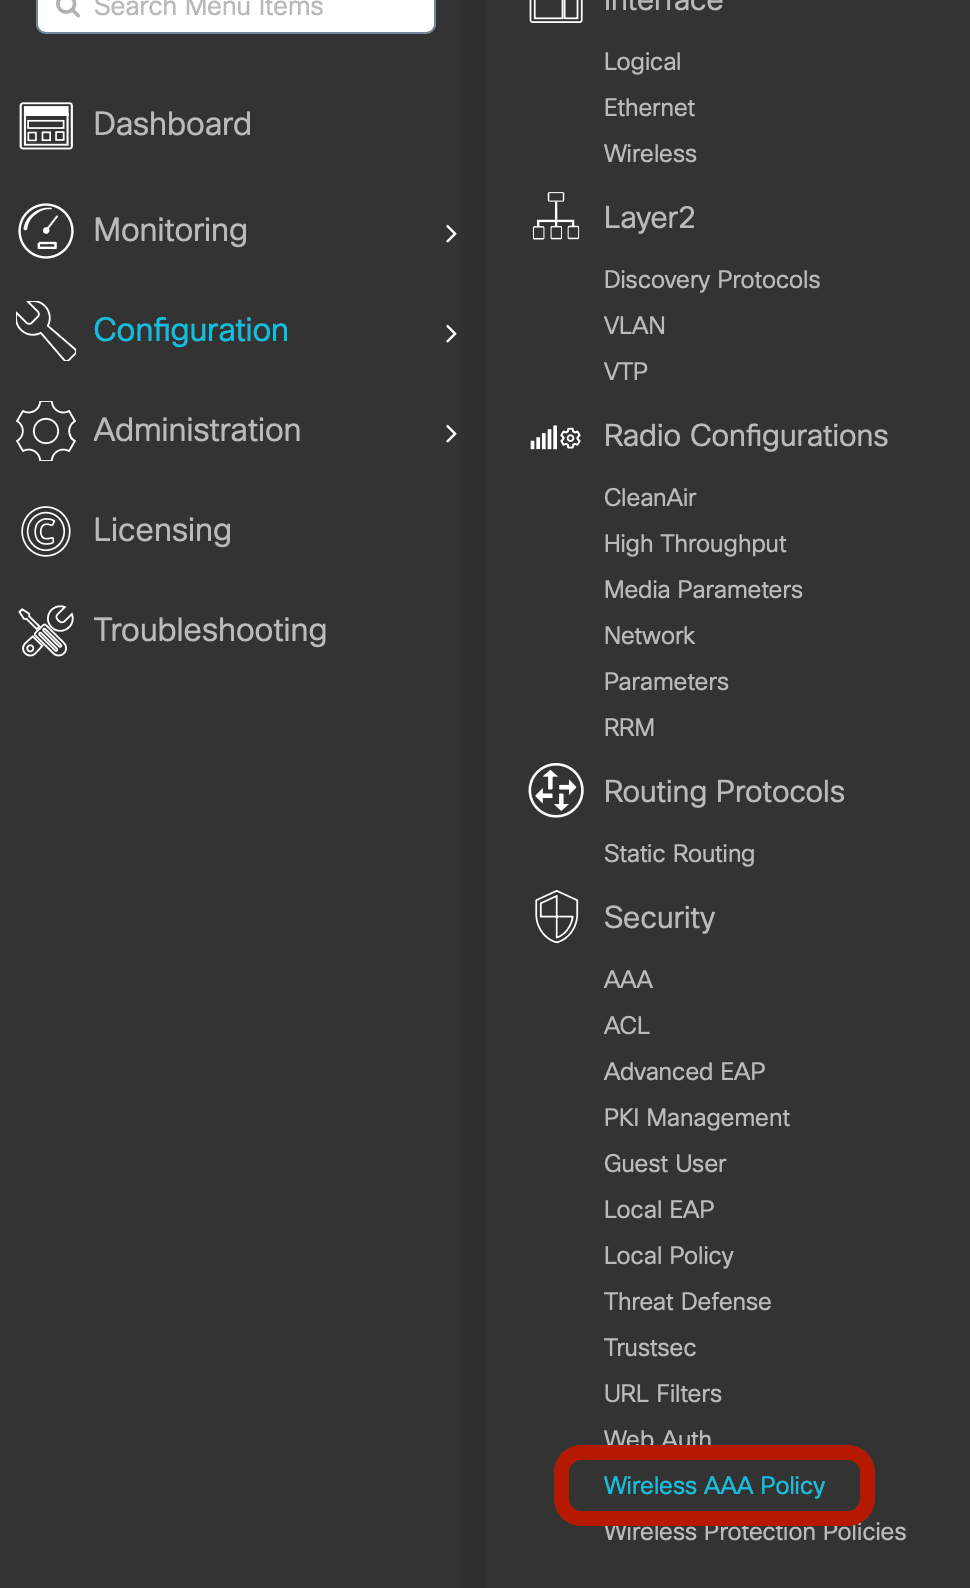
Click on Configuration -> Security -> Wireless AAA Policy
-
Click on +Add
-
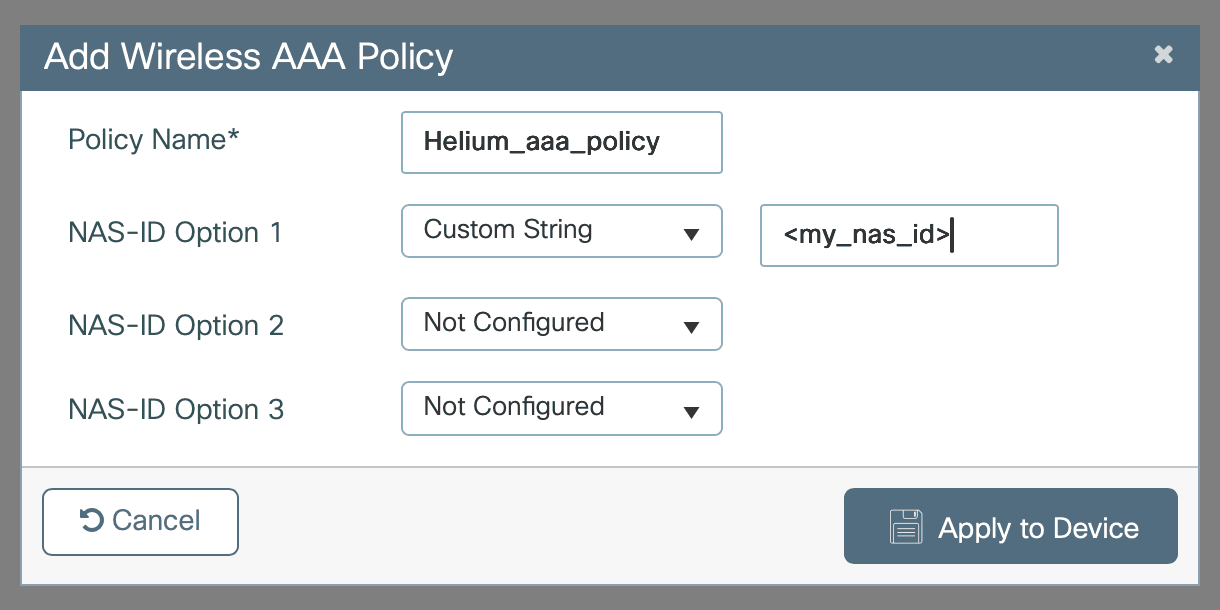
Enter a Name, e.g. Helium_aaa_policy
-
In the NAS-ID Option 1 drop-down select Custom
-
Enter the NAS-ID shared with you by Helium
-
Click Apply to Device
Build Hotspot 2.0 Profile
-
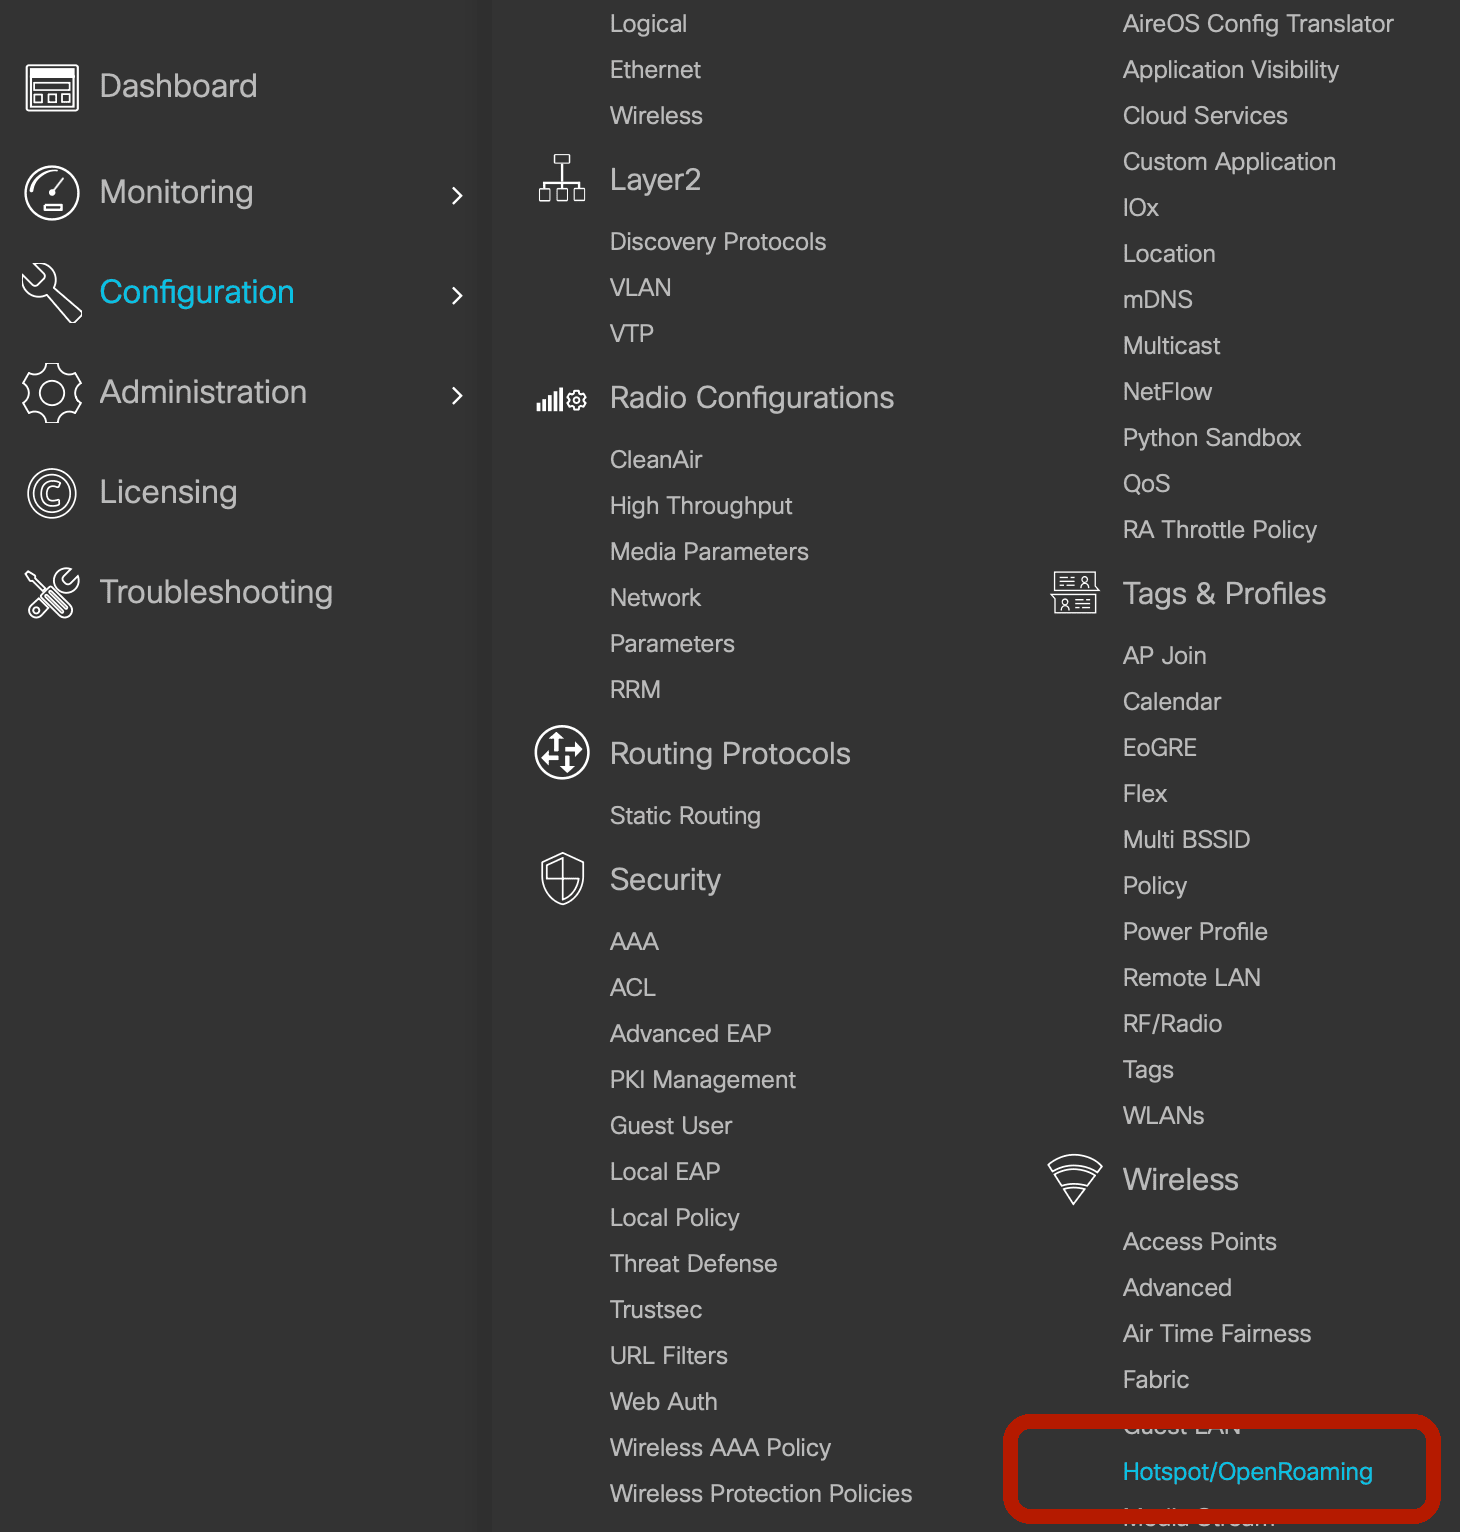
Click on Configuration -> Wireless -> Hotspot/OpenRoaming
-
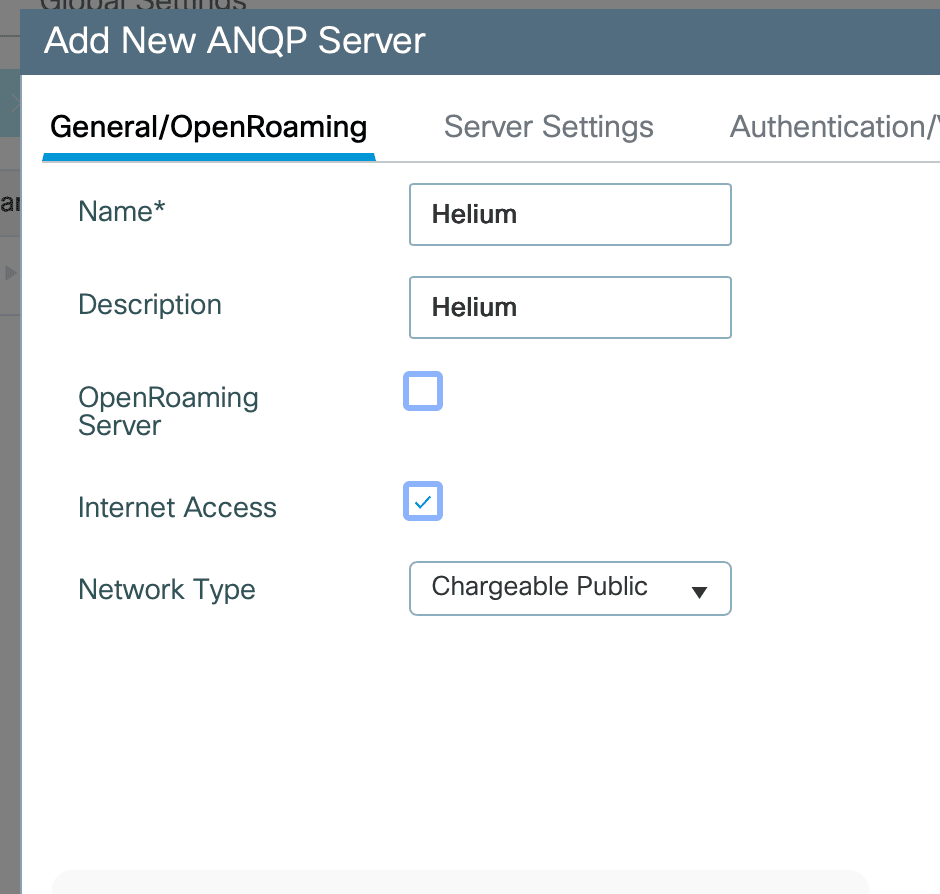
Click +Add under ANQP Servers
-
Enter Name as Helium
-
Enter Description as Helium
-
Check the box for Internet Access
-
In the Network Type drop-down select Chargeable Public
-
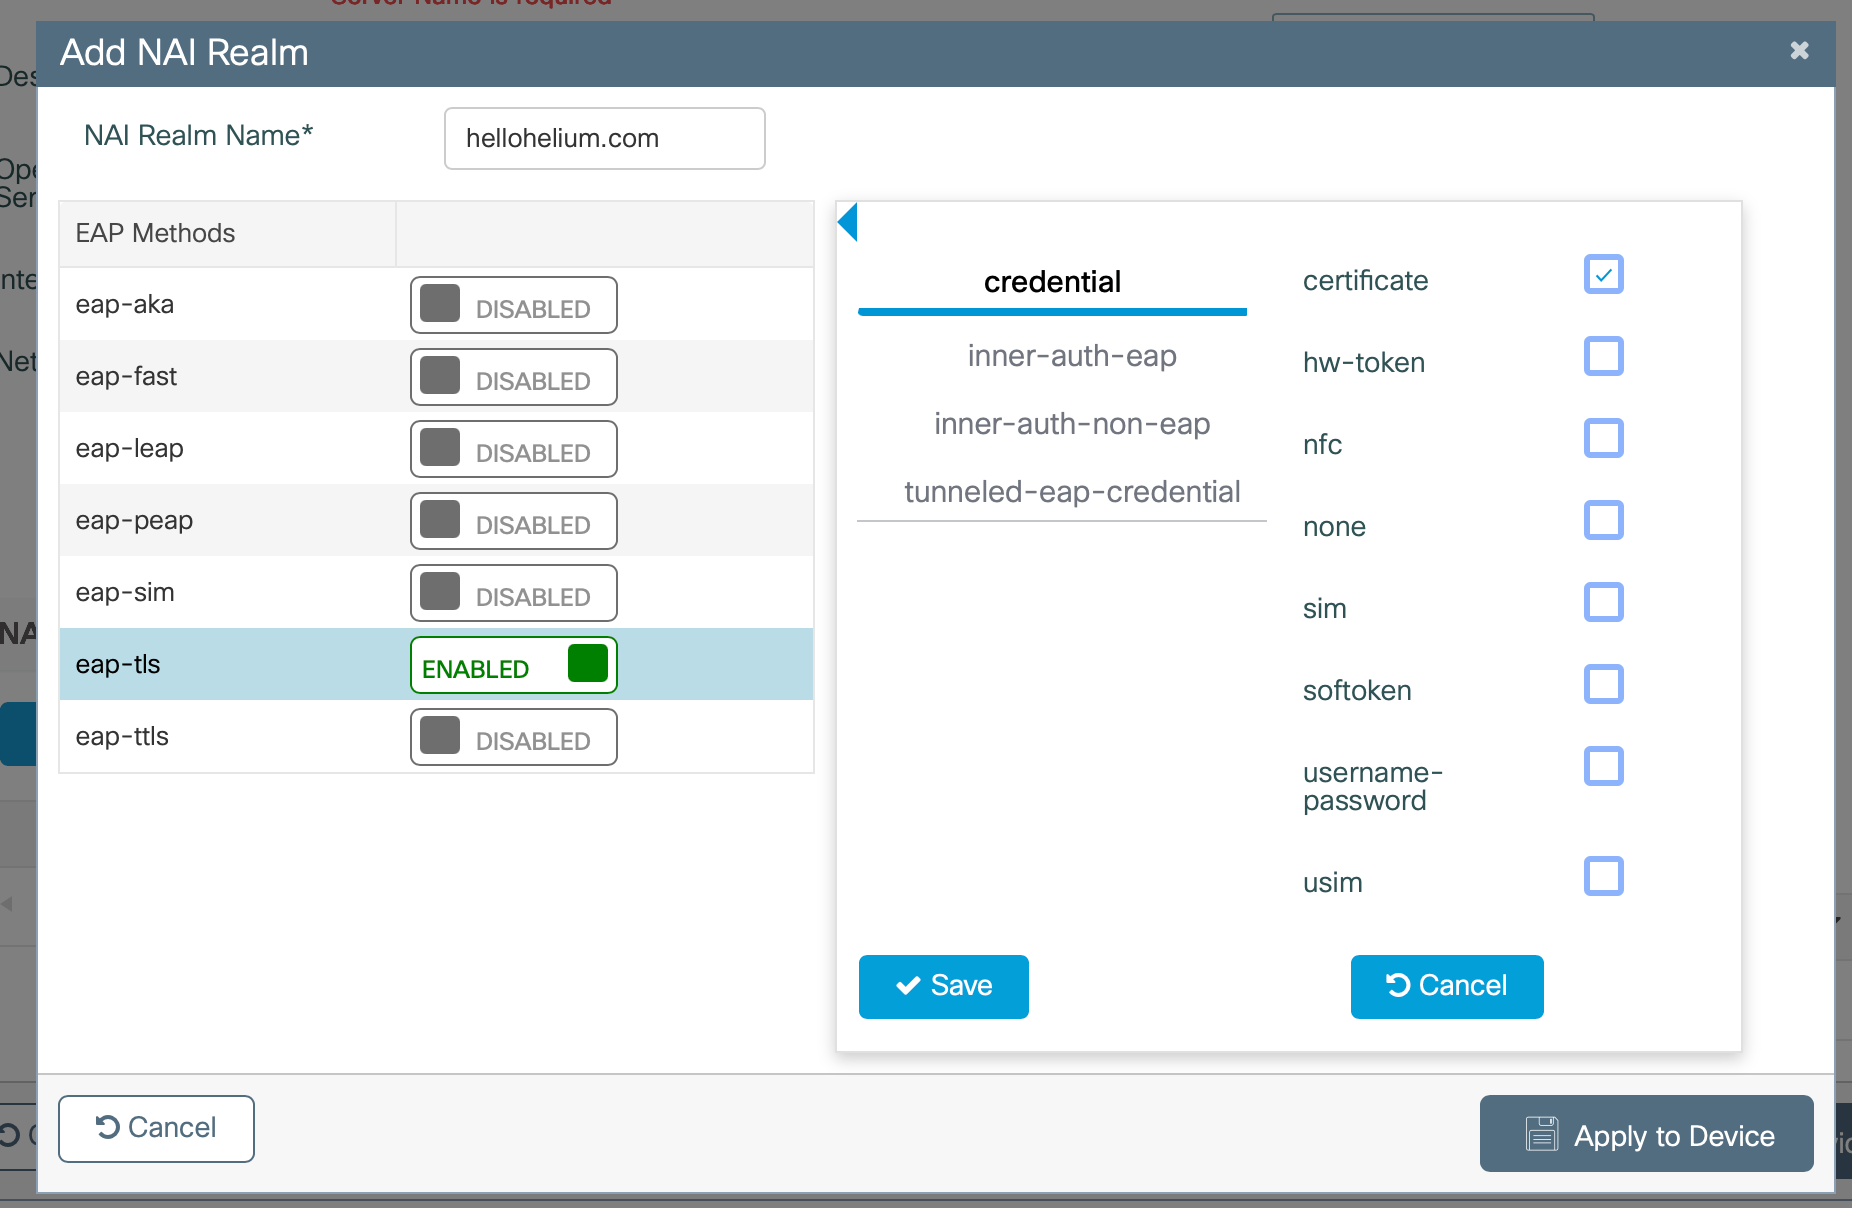
Click +Add under NAI Realm
-
Enter NAI Realm Name as hellohelium.com
-
Click to Enable the EAP-TLS option
-
Check the box for certificate
-
Click Save
-
Click Apply to Device
-
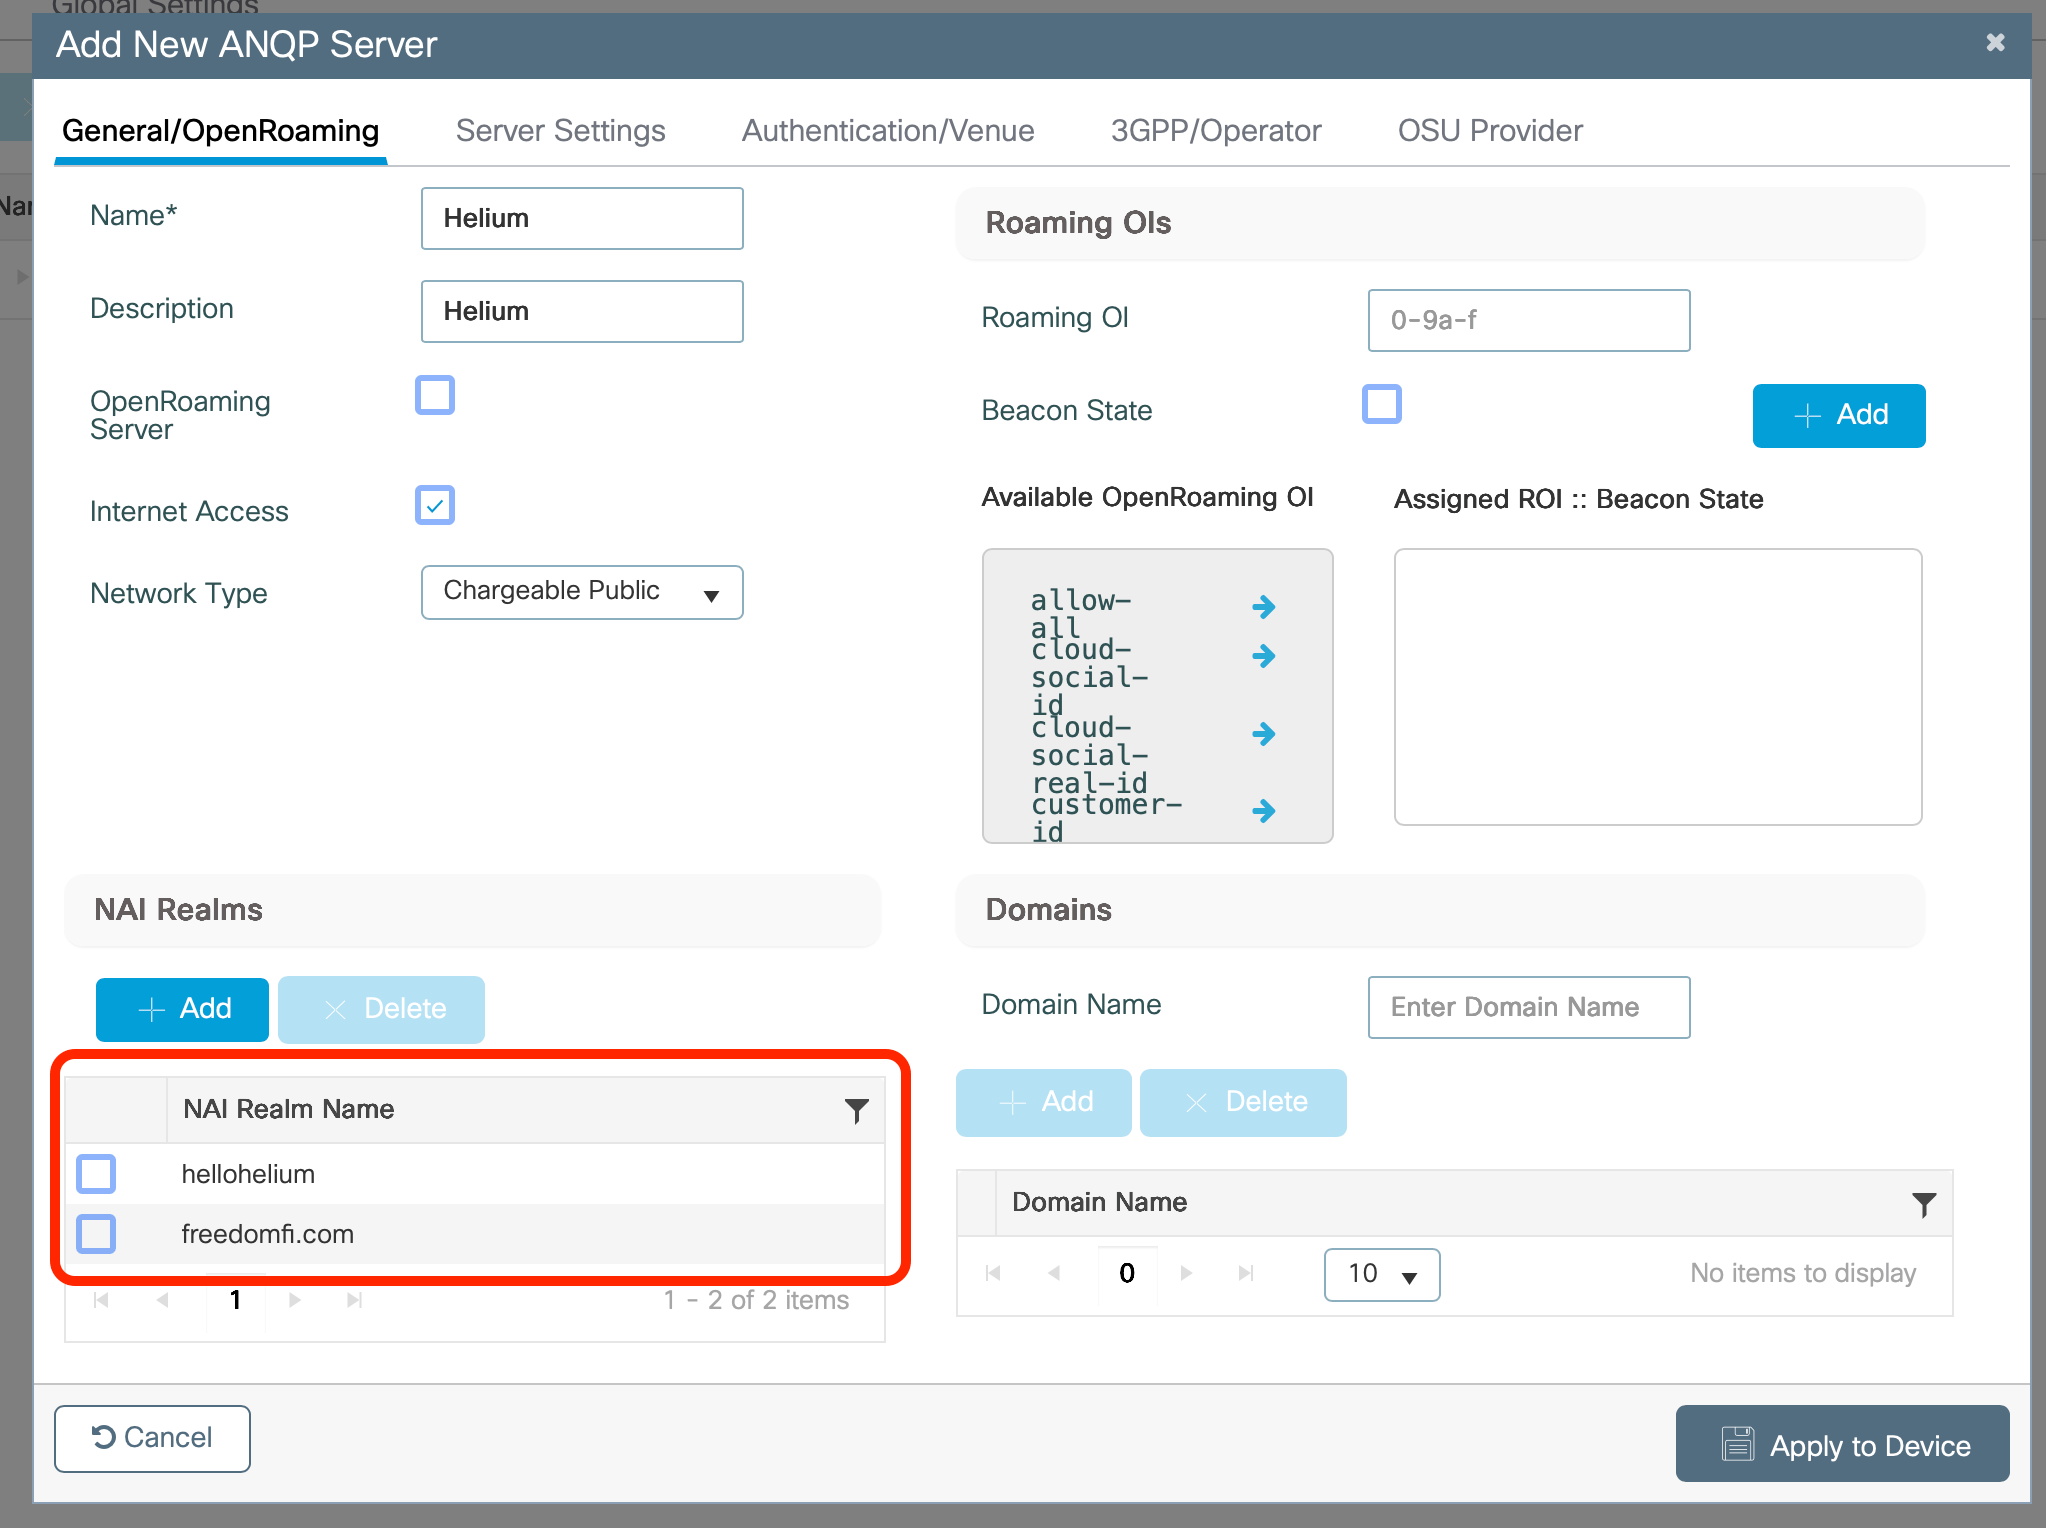
Repeat the steps to add a second NAI realm for freedomfi.com
-
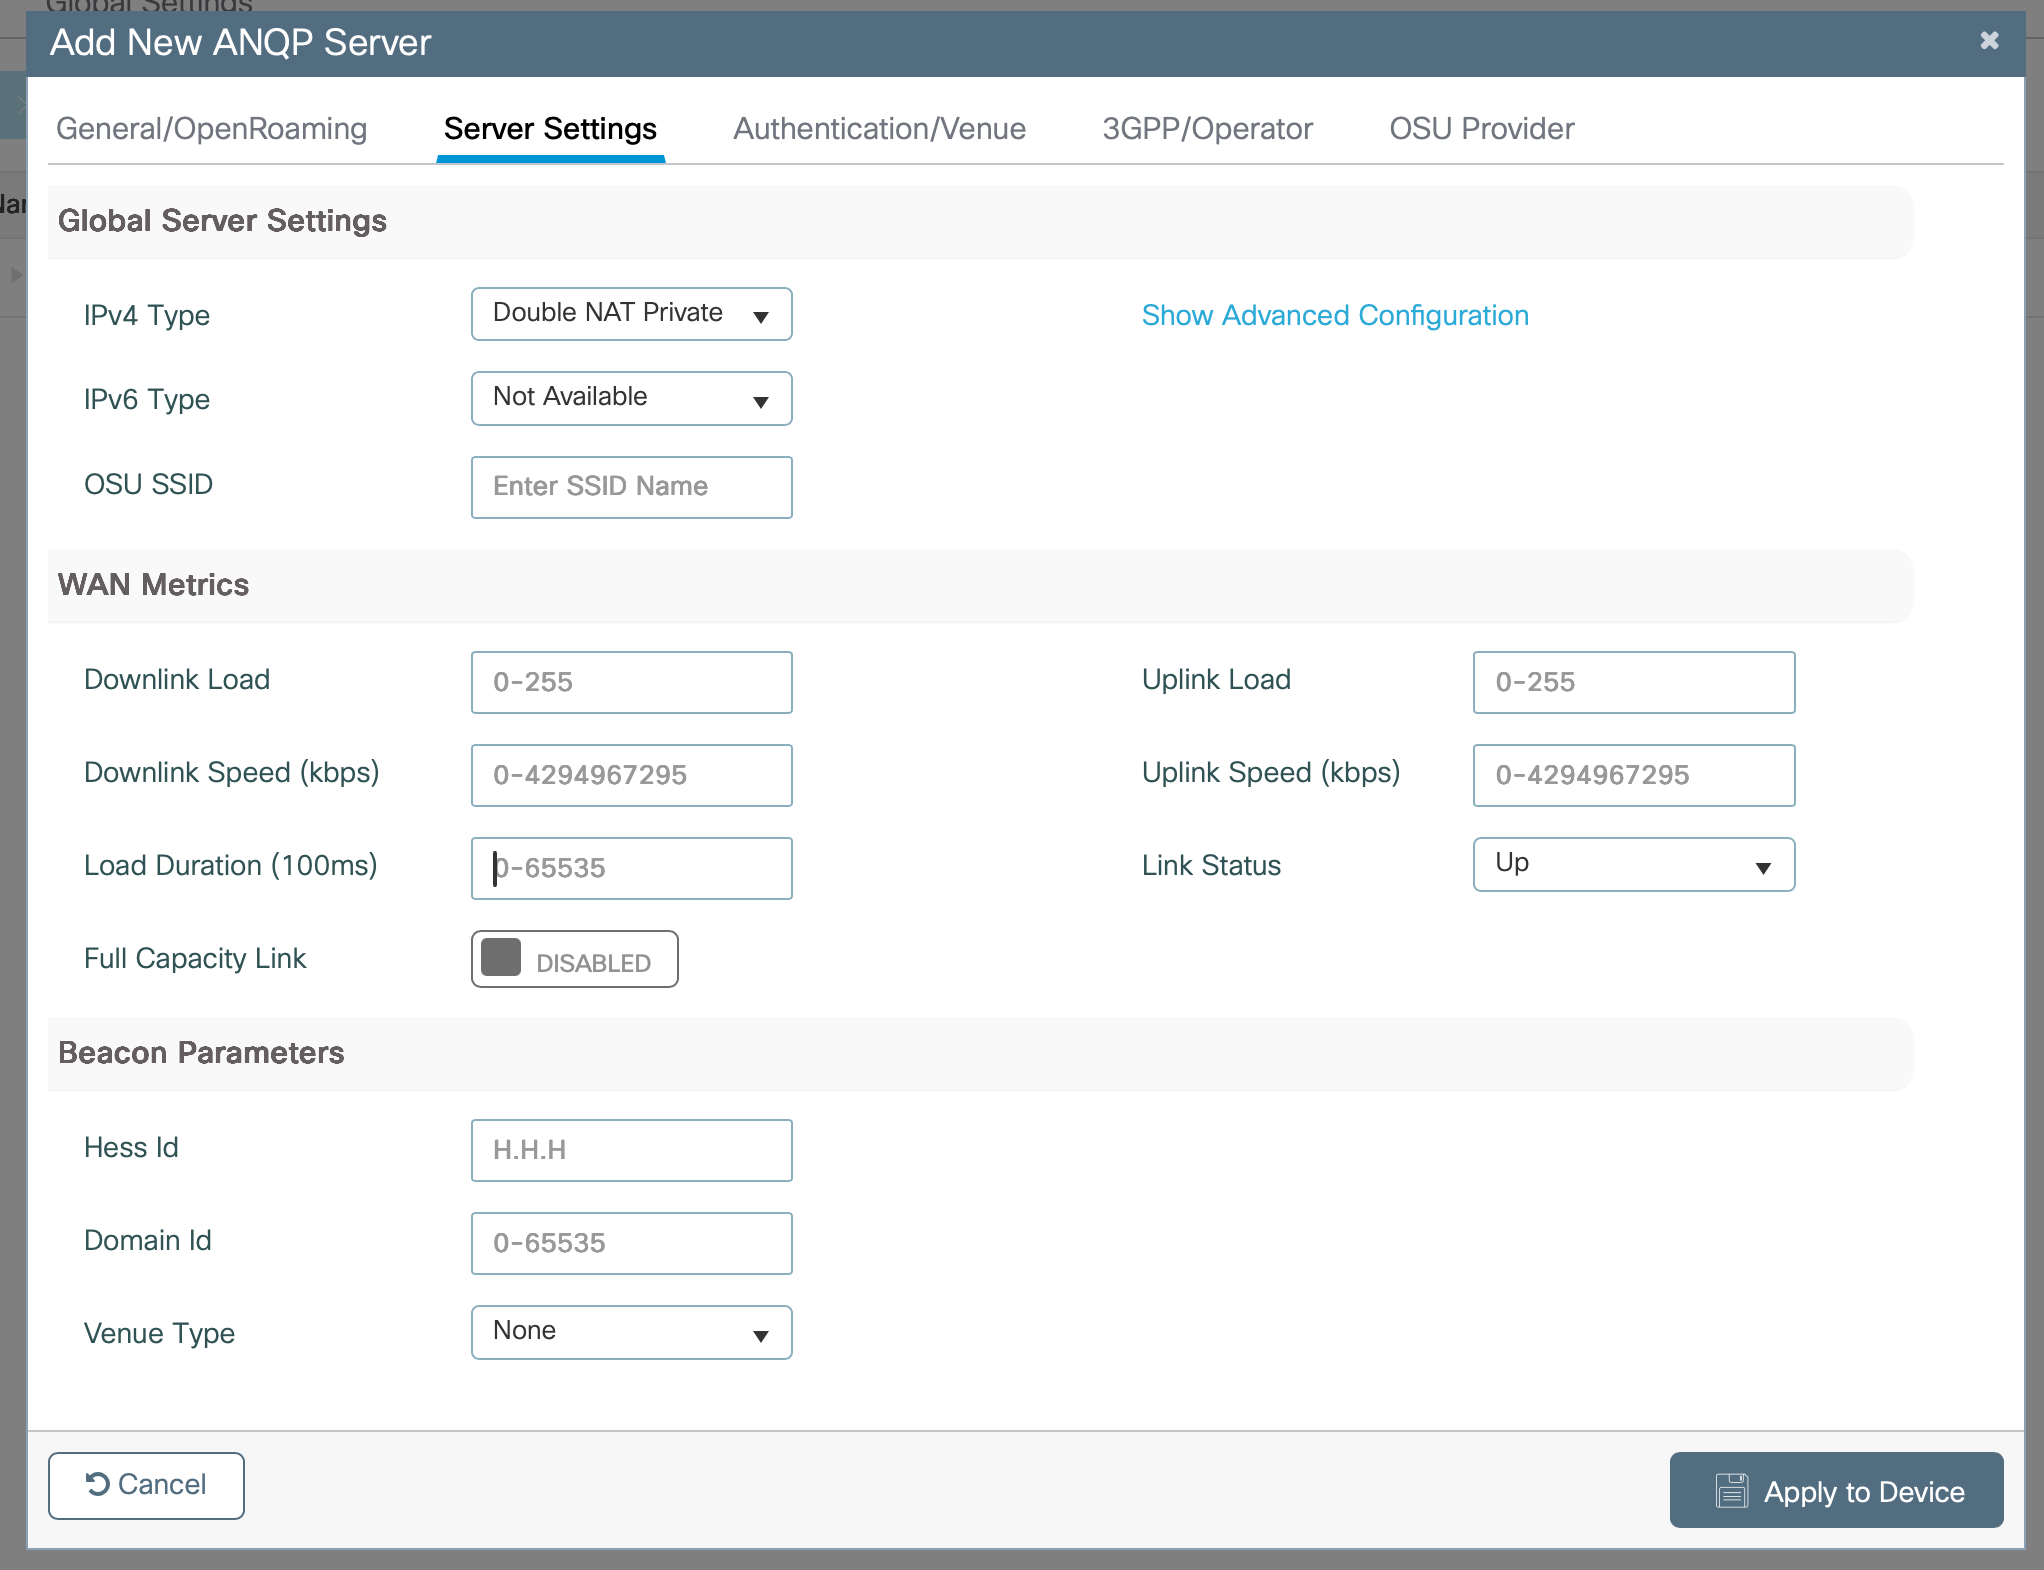
At the top of the window select Server Settings
-
In the drop-down for IPv4 Type select Double NAT Private (or the option that appropriately describes your network)
-
In the drop-down for IPv6 Type select Not Available
-
Click Apply to Device
Build the Helium SSID
- Click on Configuration -> Wireless -> WLANs
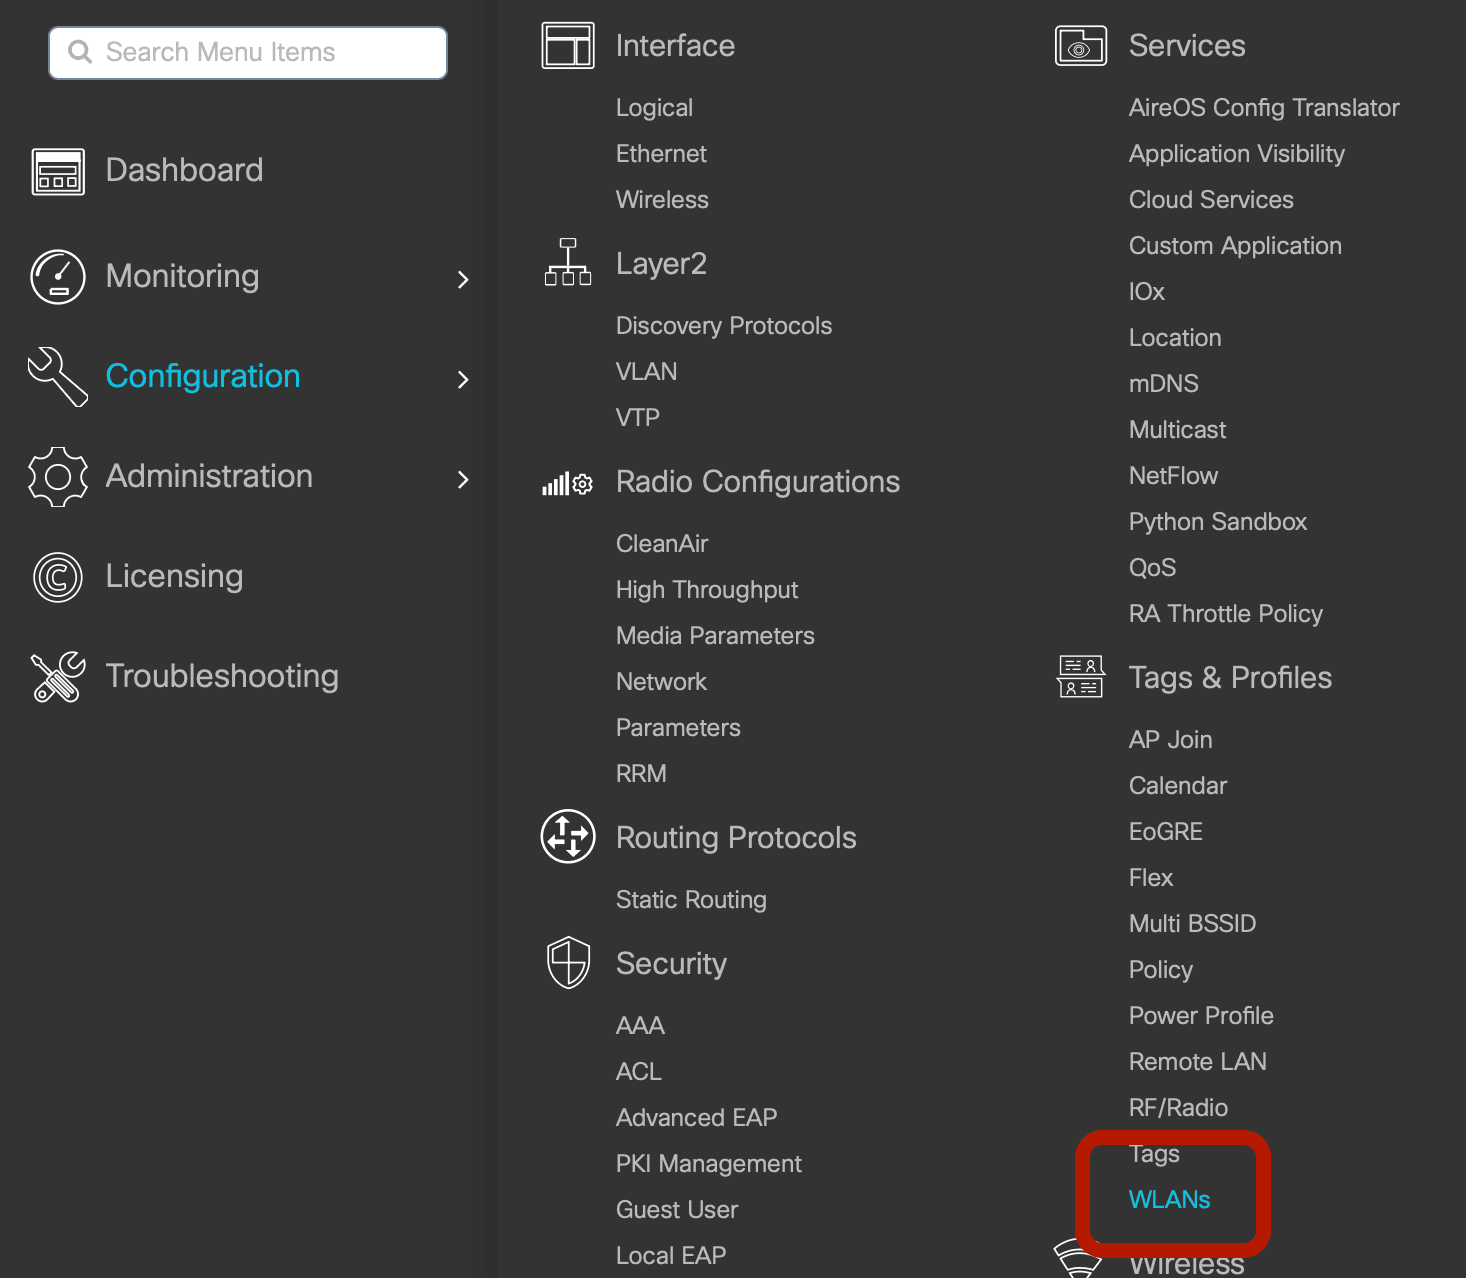
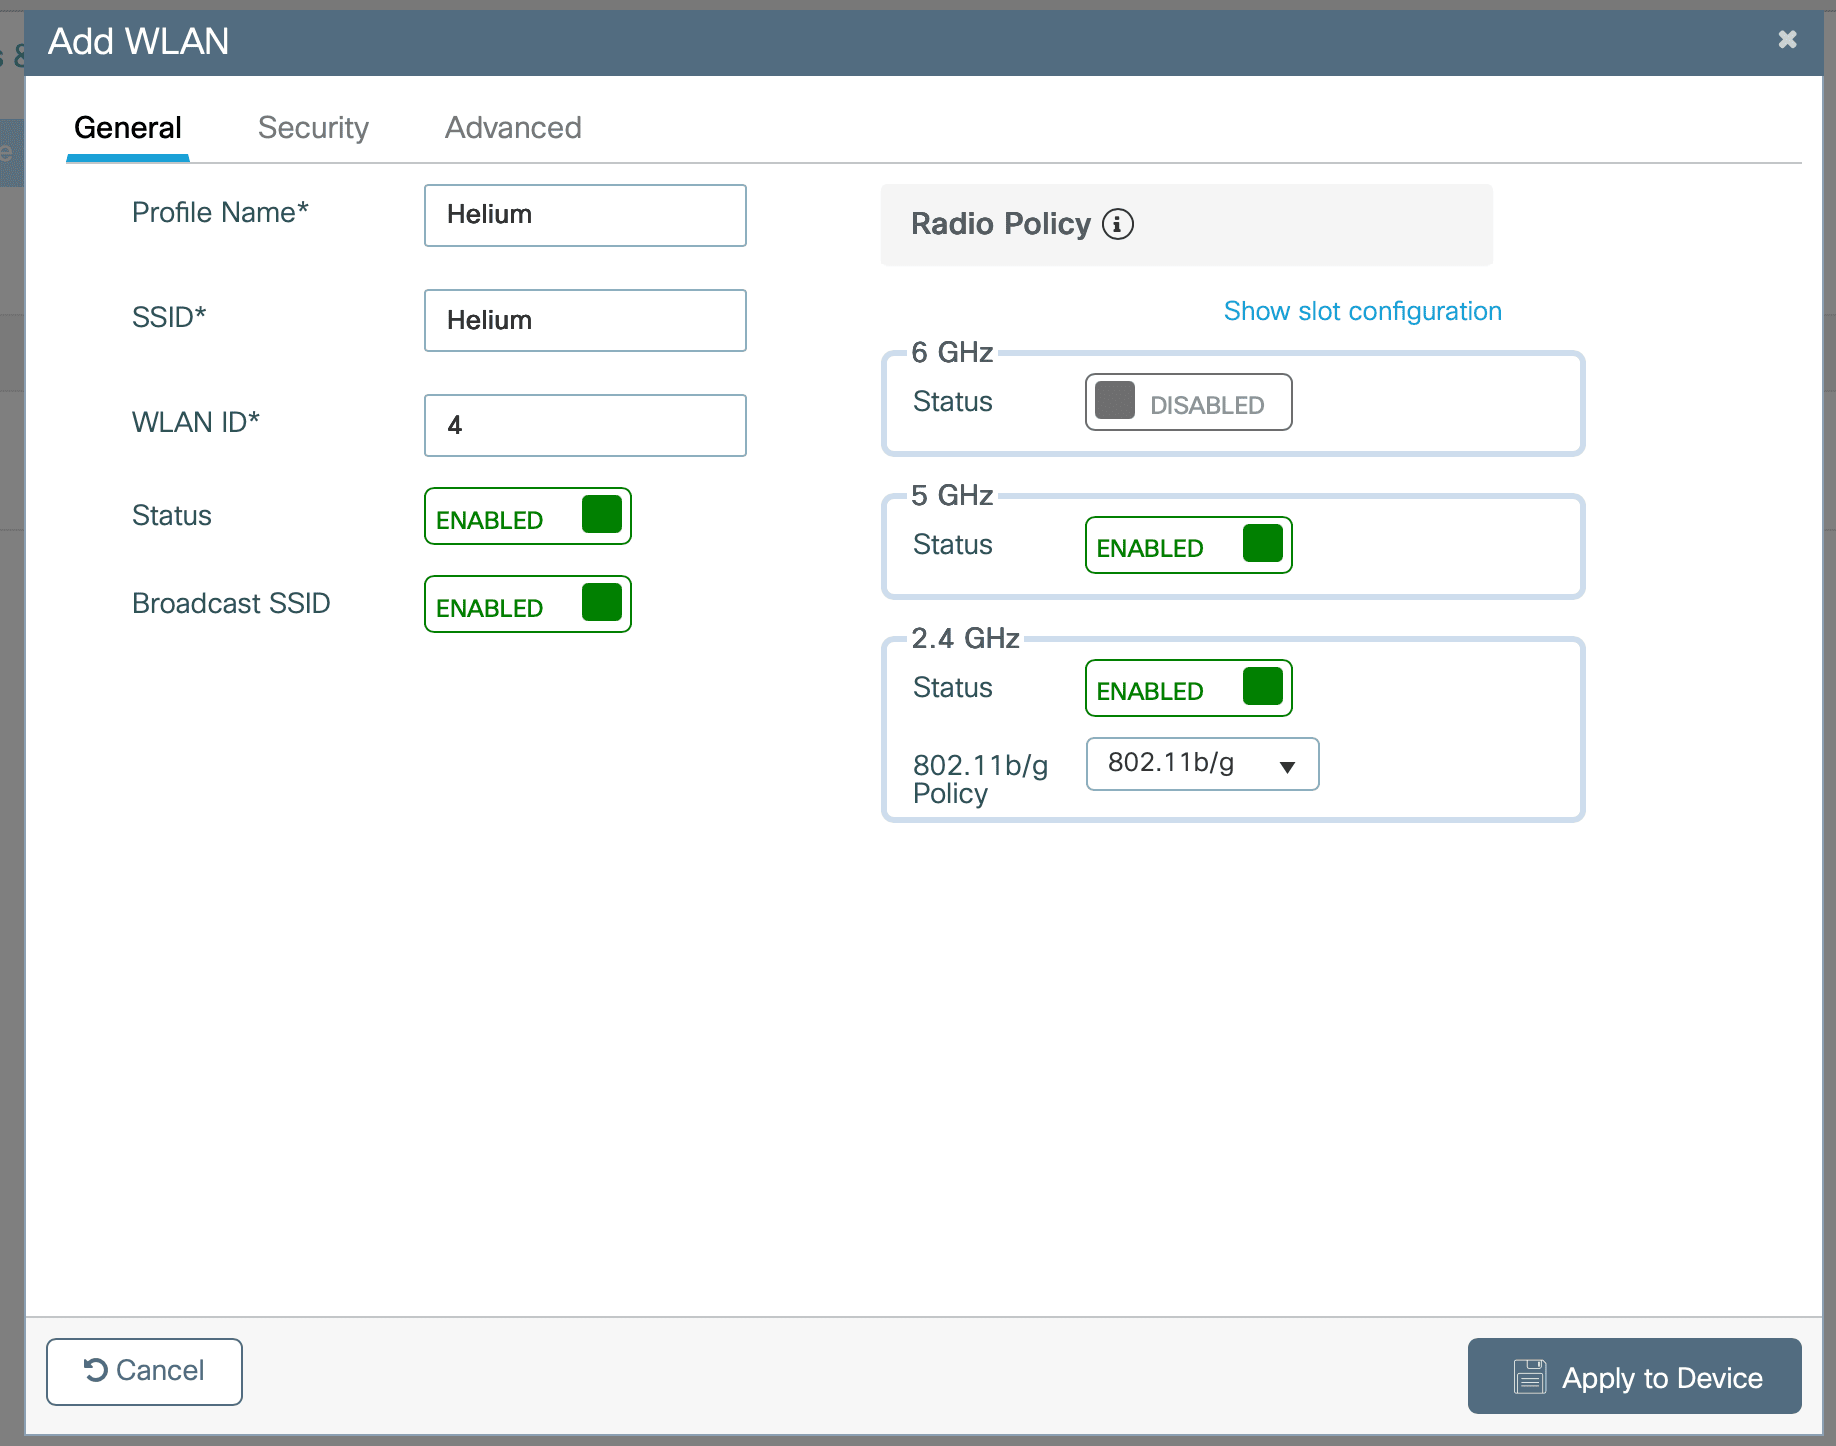
- Click on +Add
- Enter Name as Helium
- Enter SSID as Helium
- Enter WLAN ID as your next available integer, e.g. 4
- Select Enable to turn the SSID on
- Select Enable/Disable for 6GHz as your hardware supports
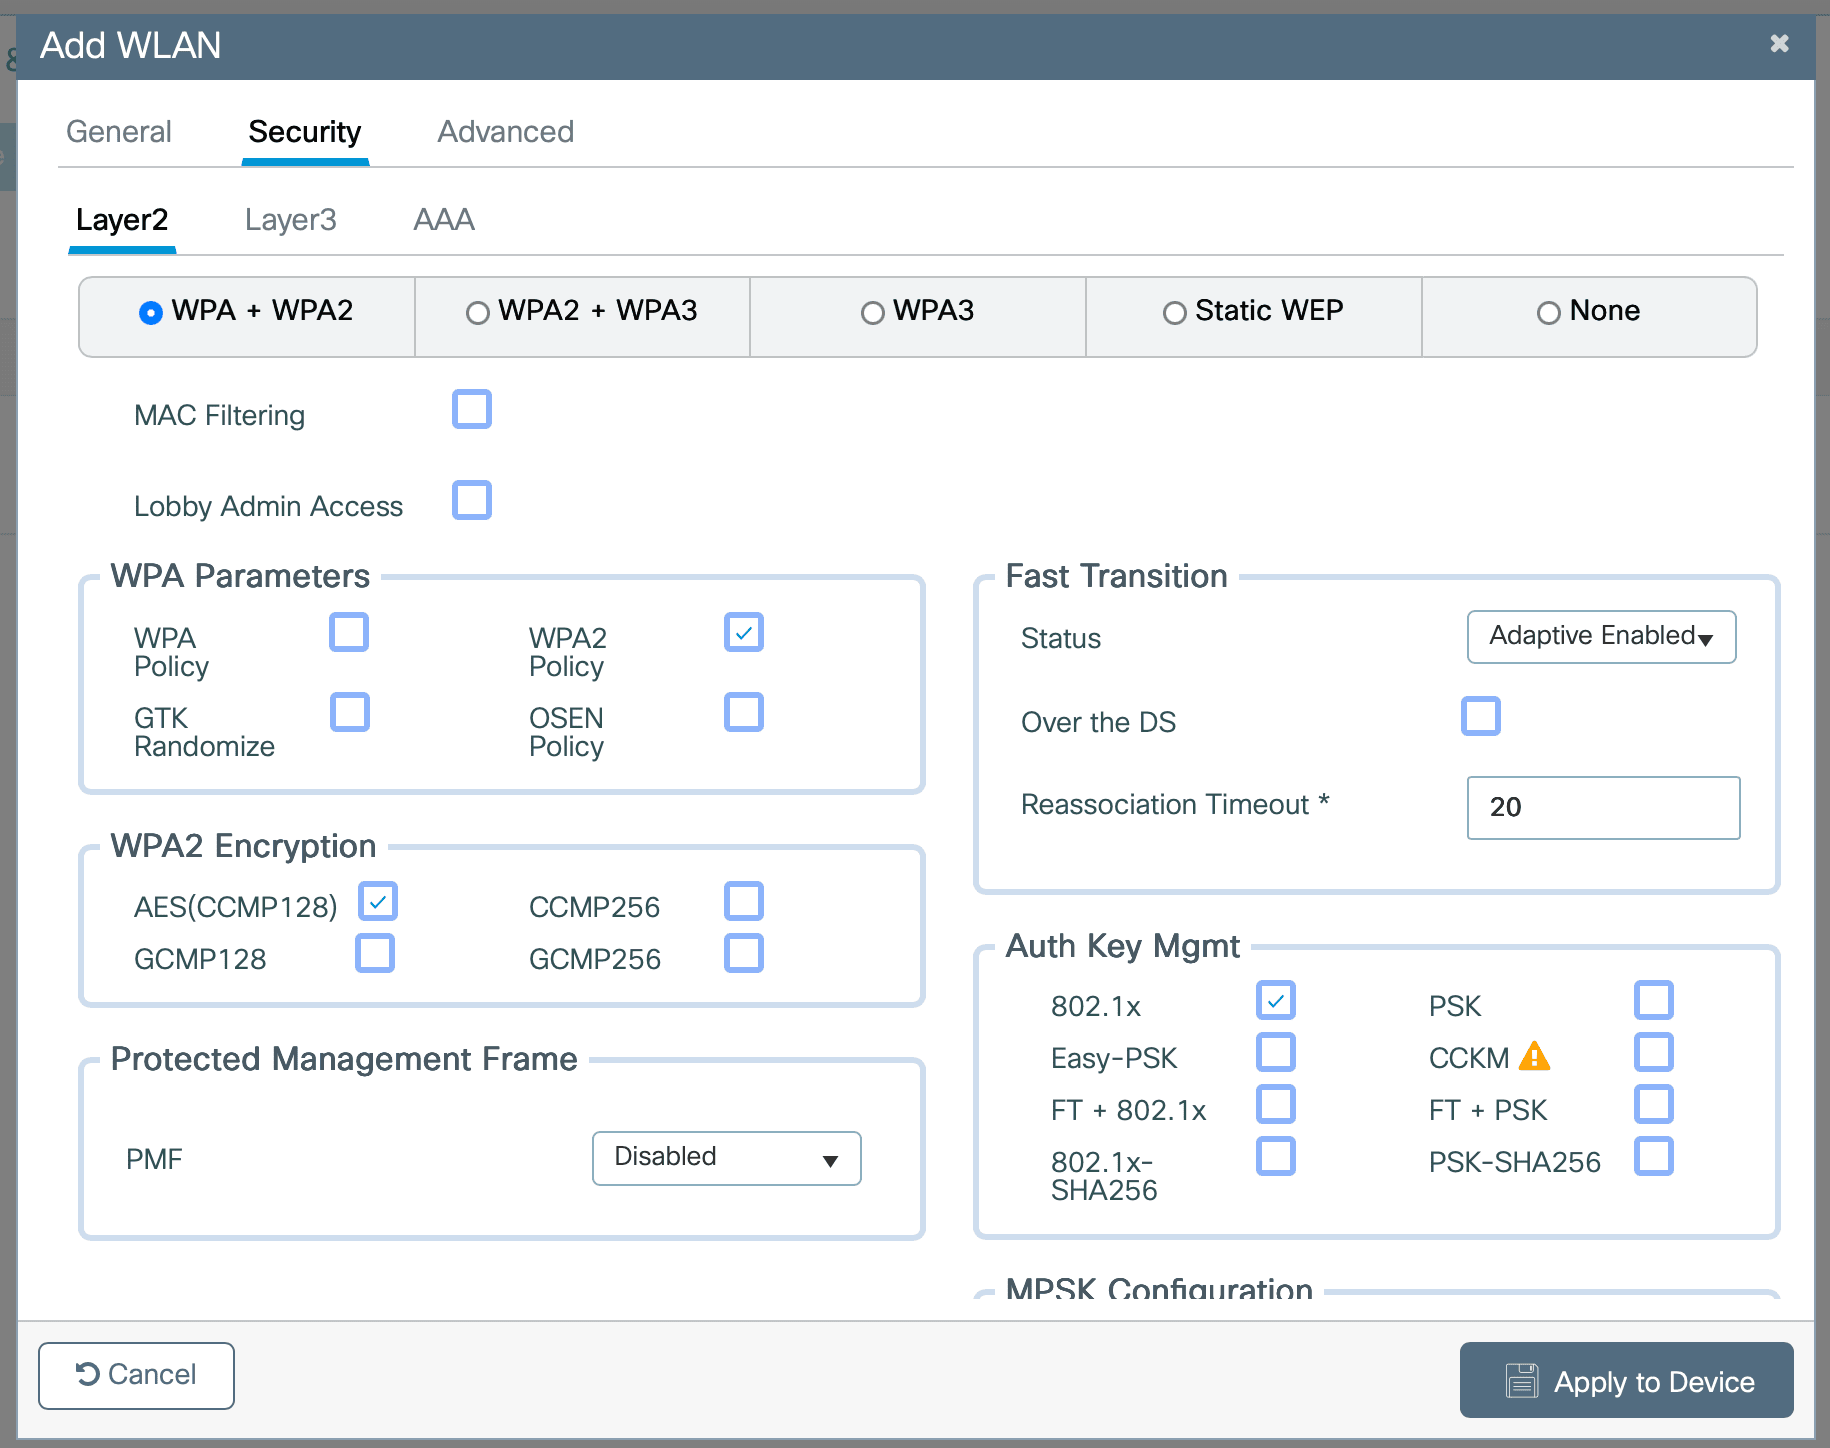
- Select Security at the top of the window
- Select Layer2 in the row below that
- Ensure the following boxes are checked, including WPA2 Policy, AES(CCMP128),
802.1x
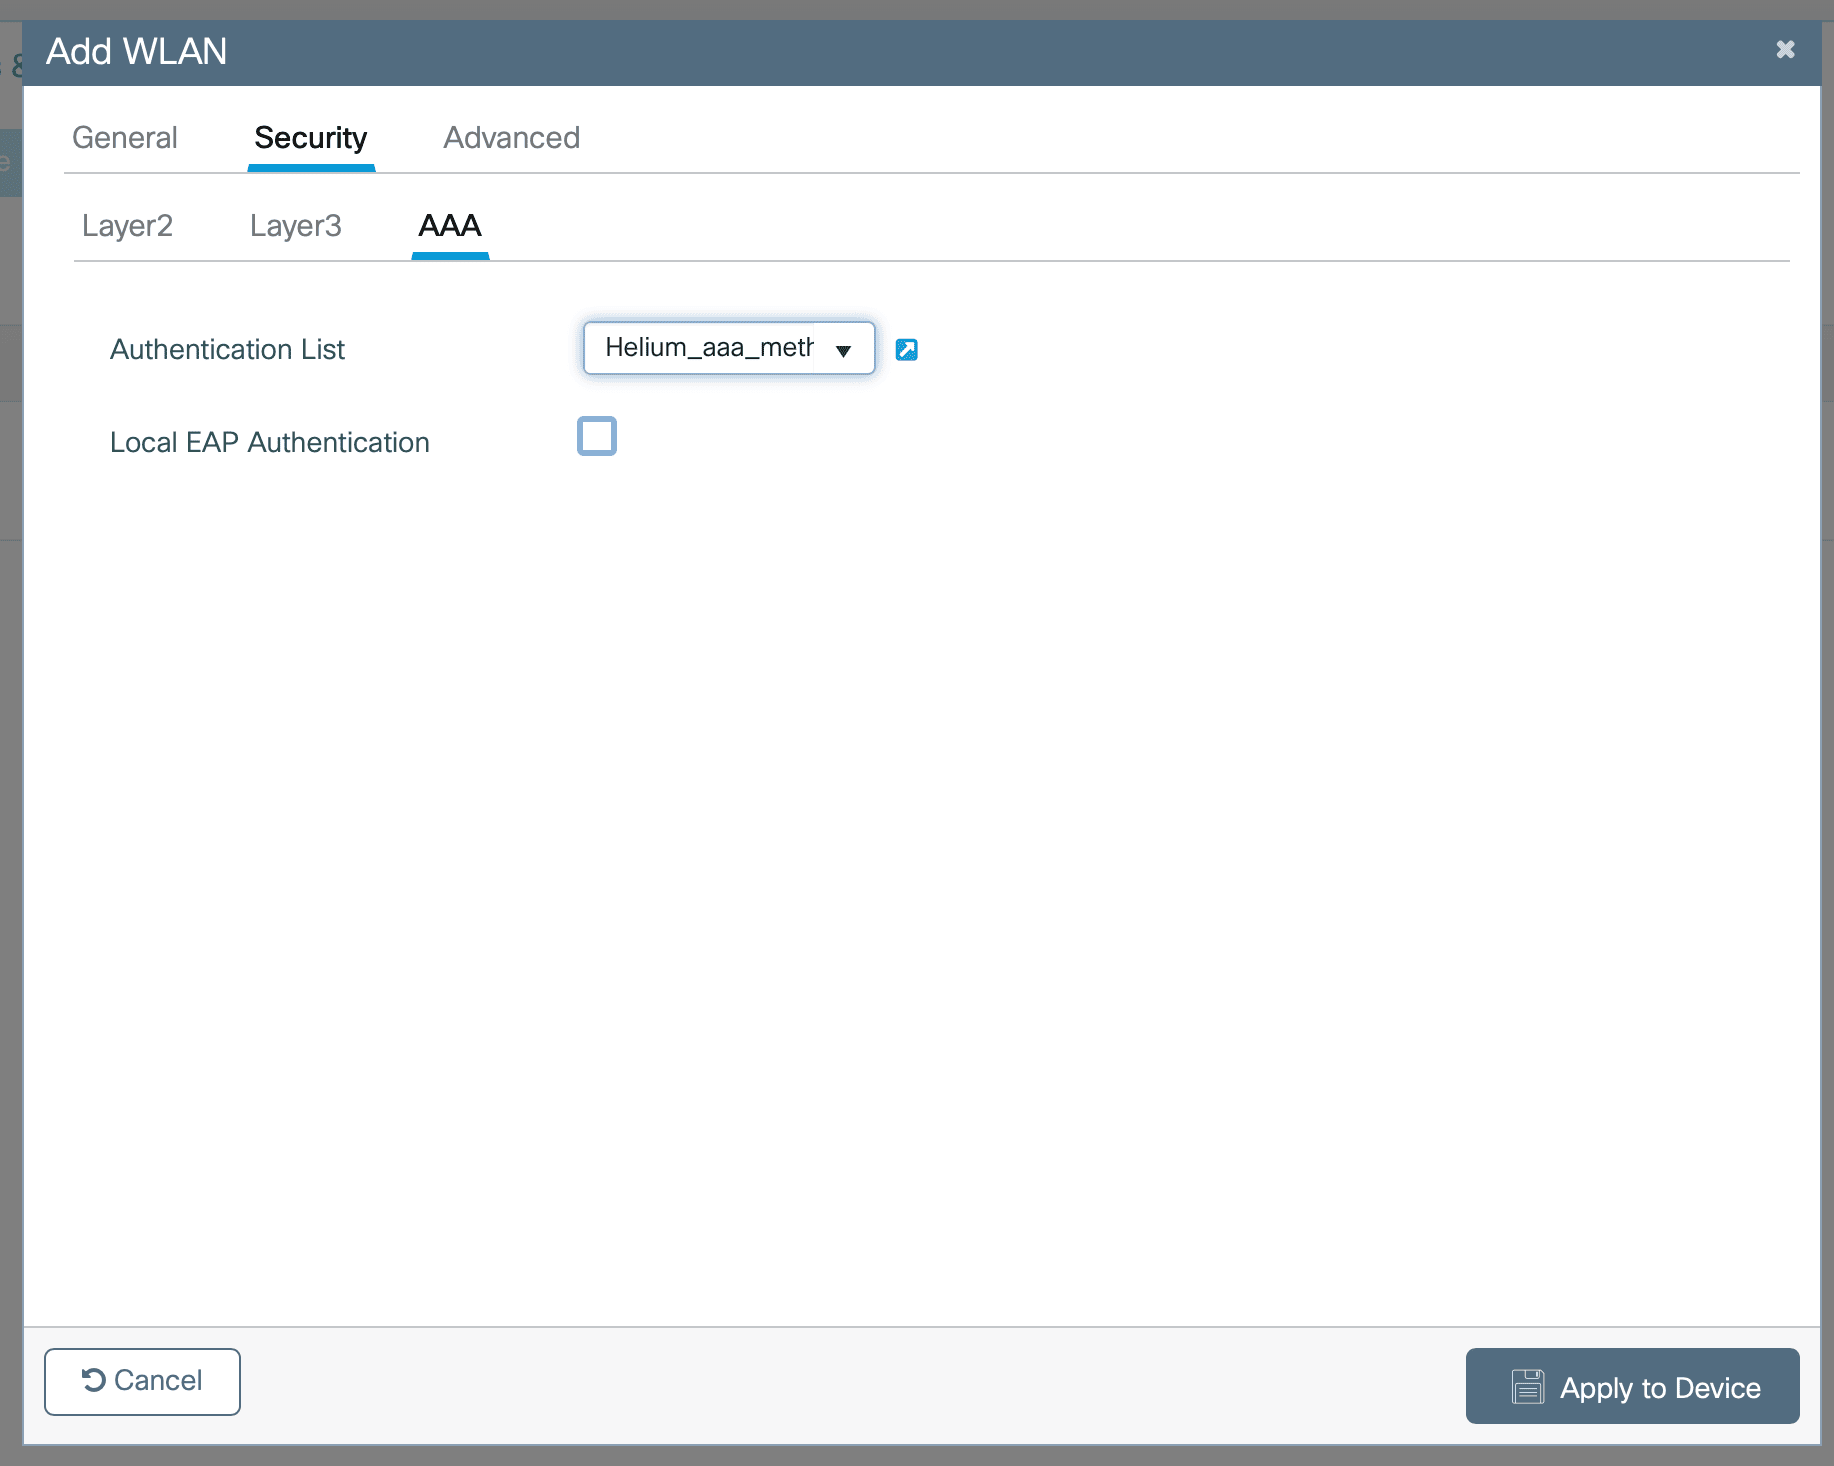
- Select AAA at the top of the window
- In the Authentication List drop-down select Helium_aaa_meth_list
- Click Apply to Device
Apply Policy and Hotspot Profile to the SSID
-
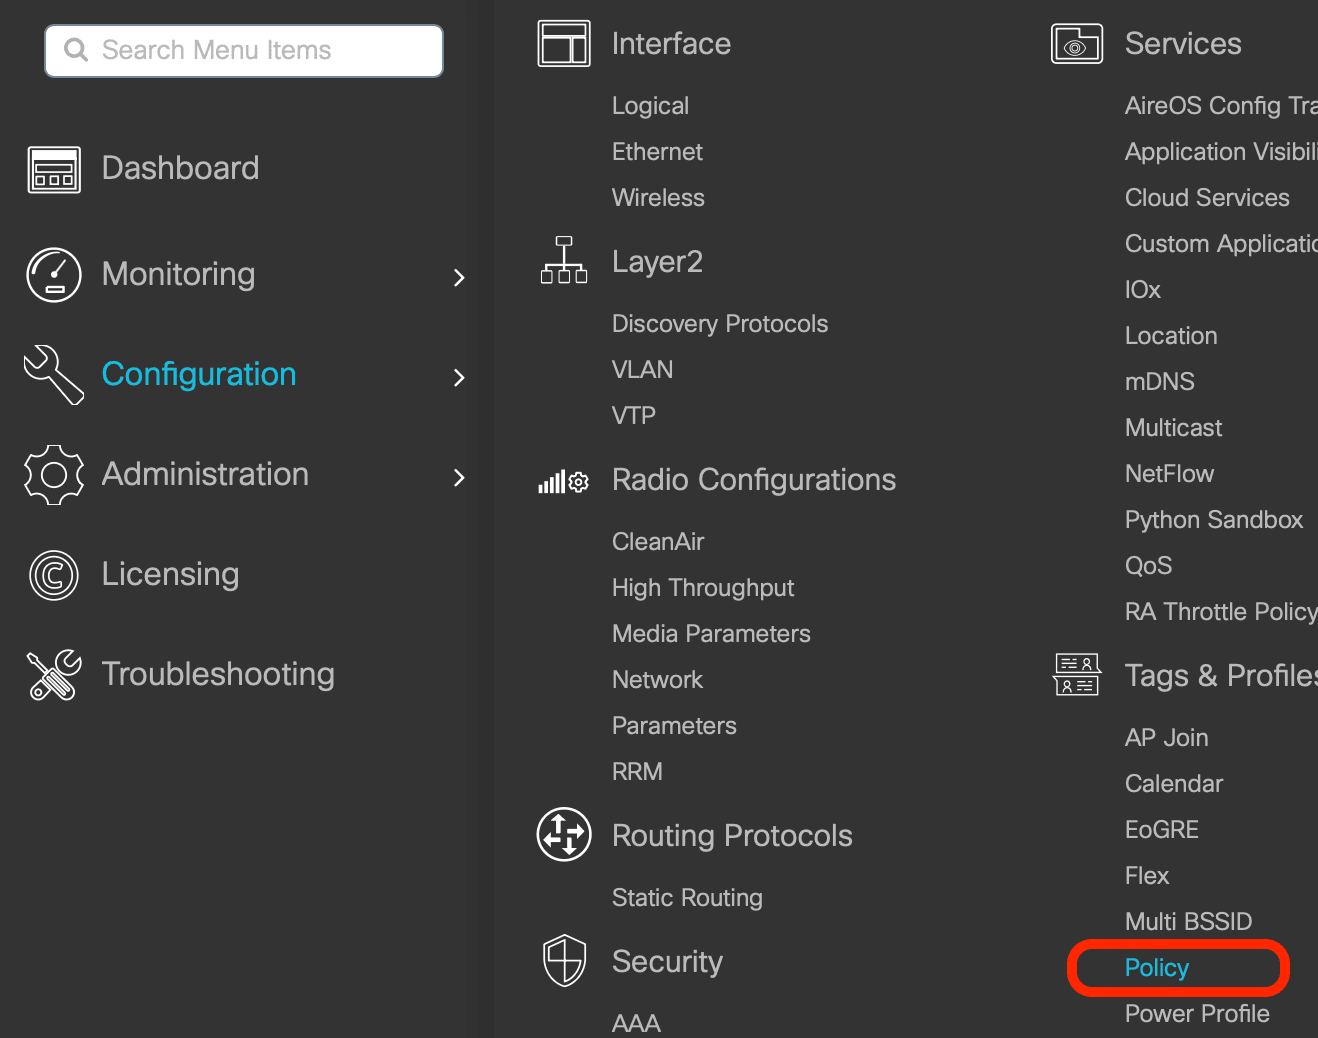
Click on Configuration -> Tags & Profiles -> Policy
-
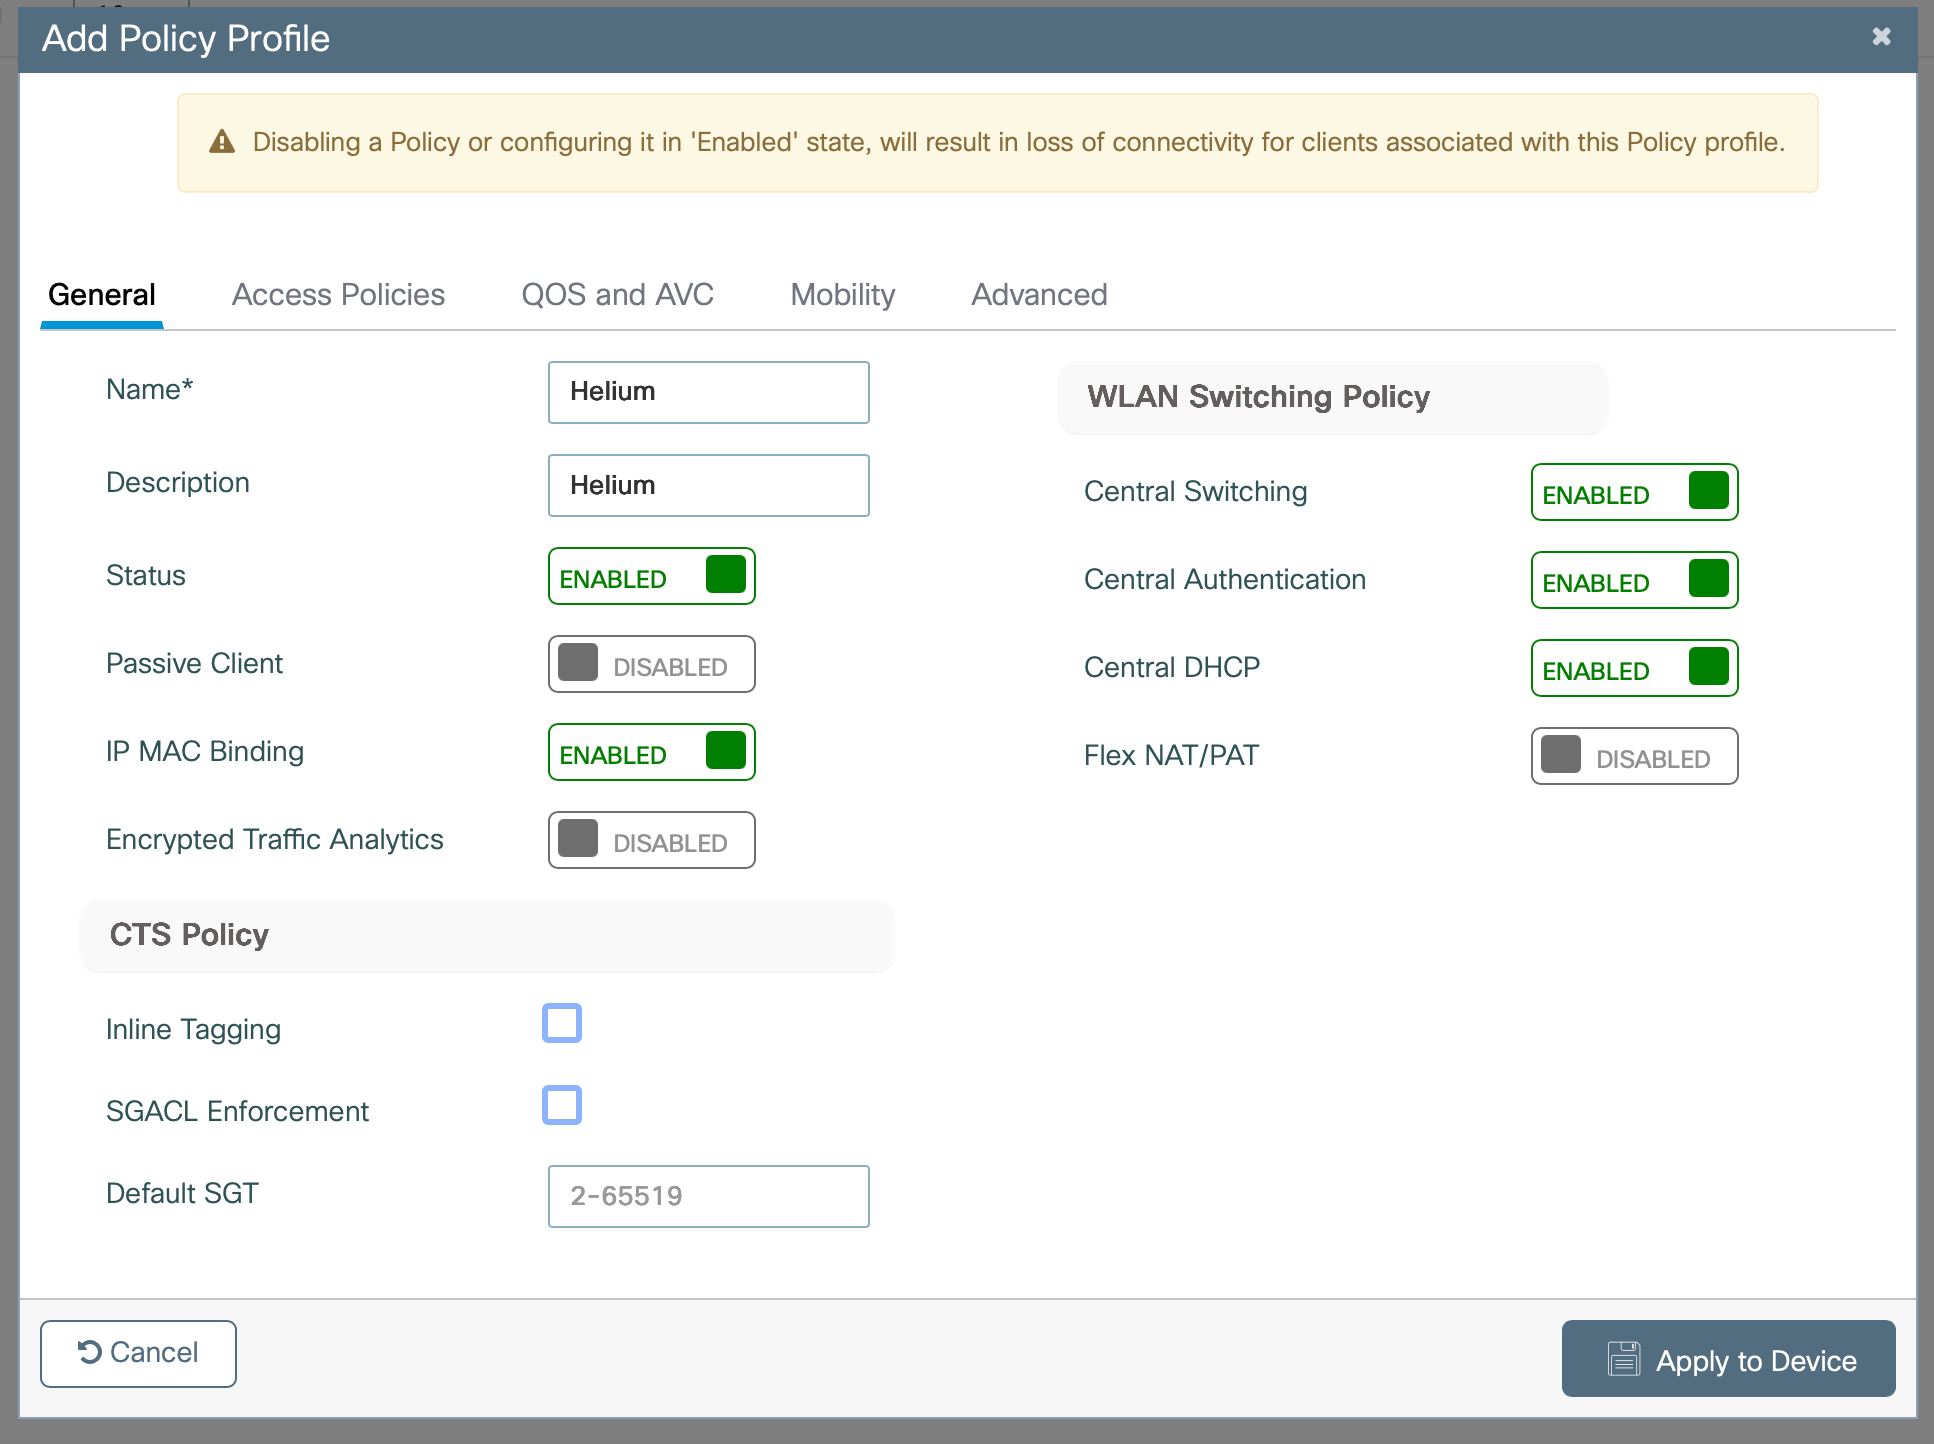
Enter Name as Helium
-
Enter Description as Helium
-
Toggle Status to Enabled
-
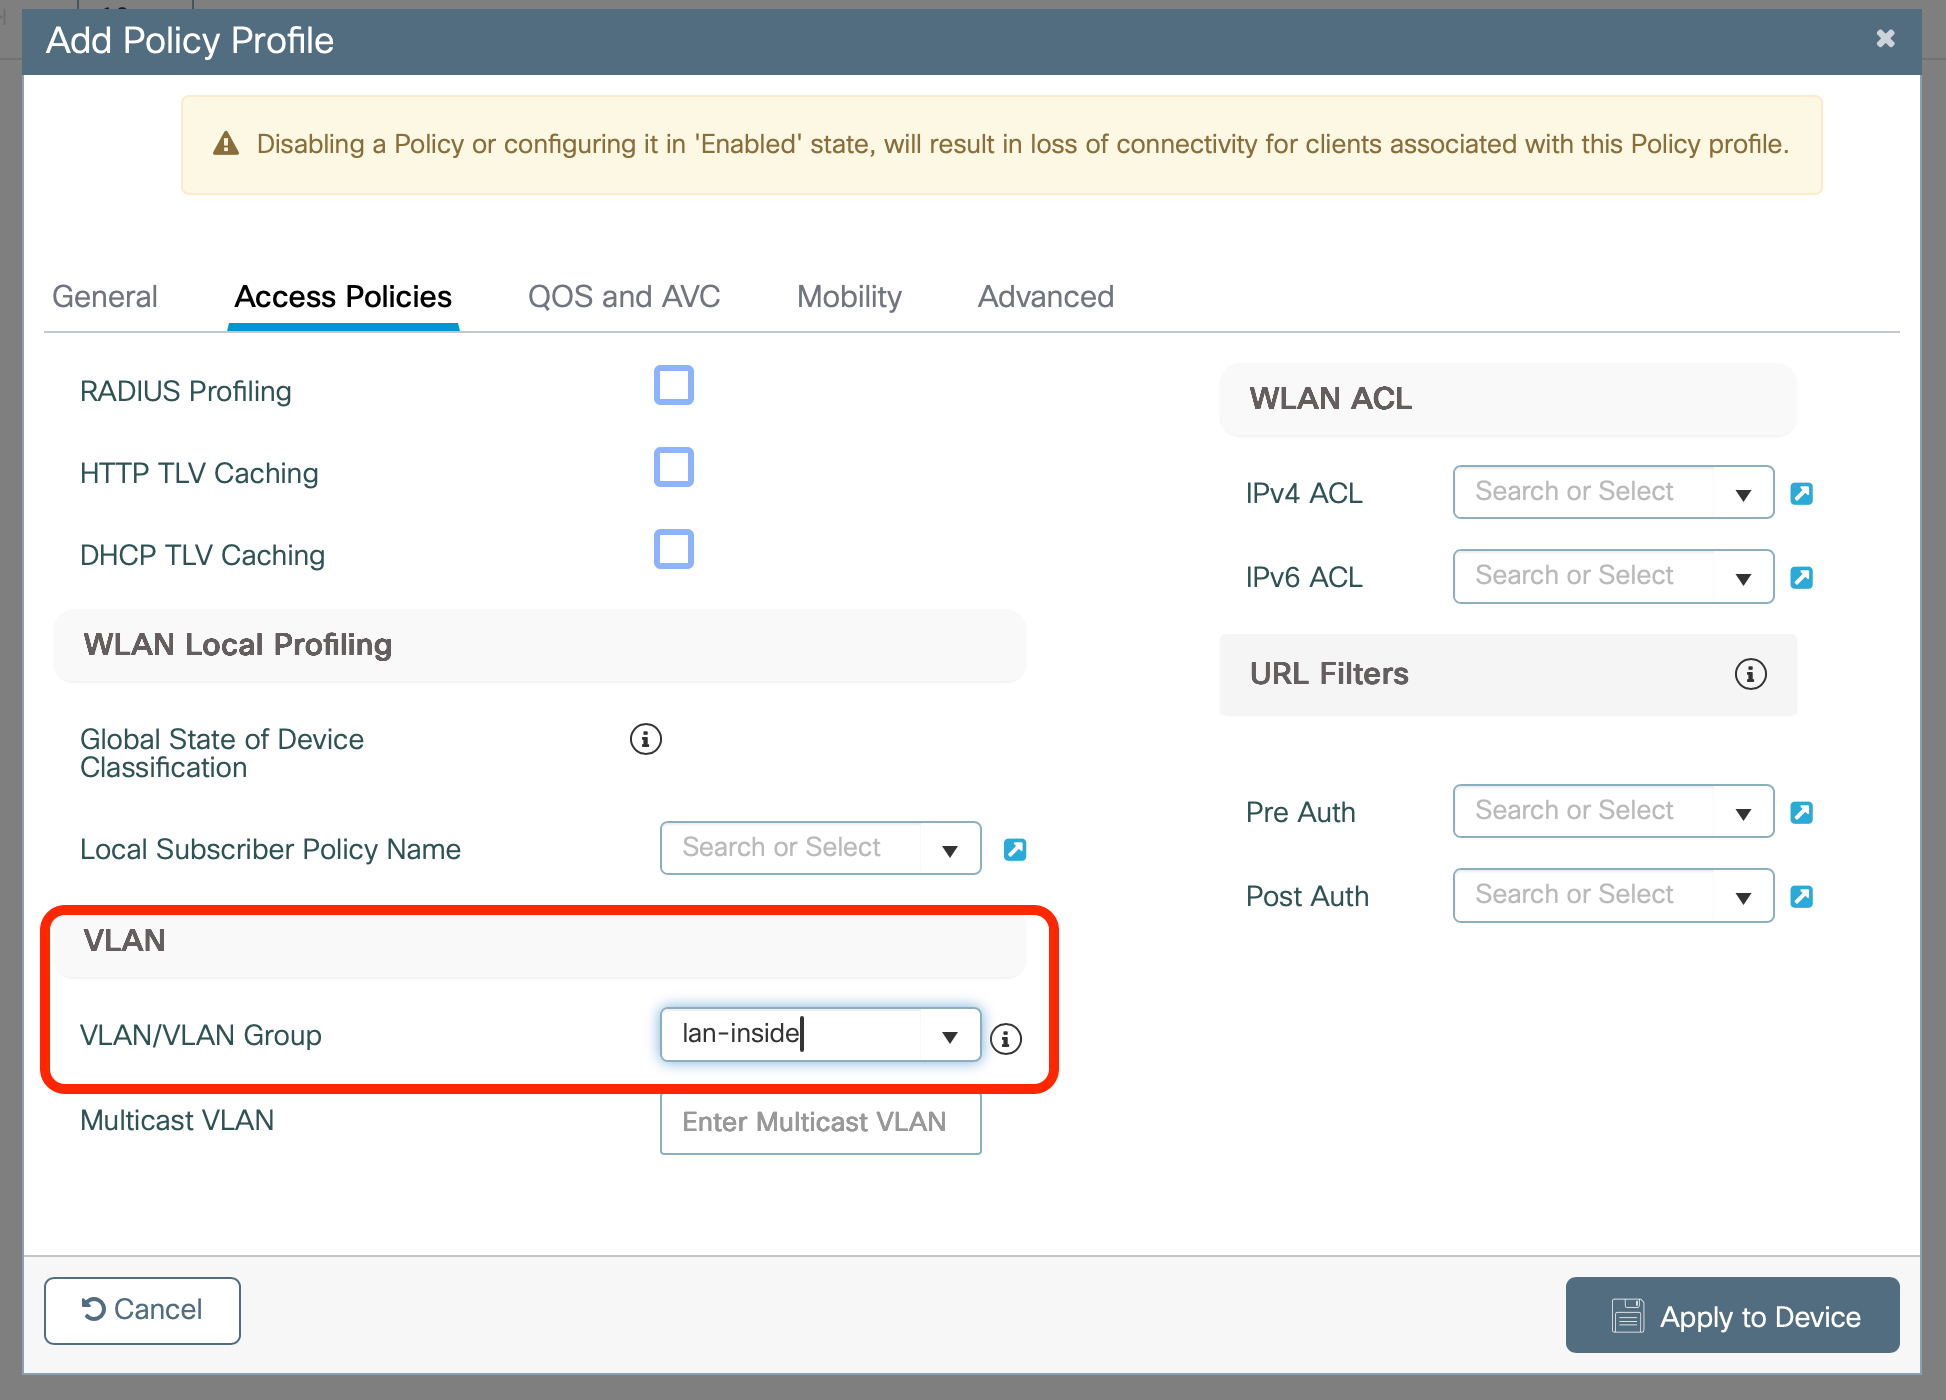
Across the top, select Access Policies
-
Select the VLAN/VLAN Group configured for Helium users (NOTE: This is typically a Guest type network with access to the internet only)
-
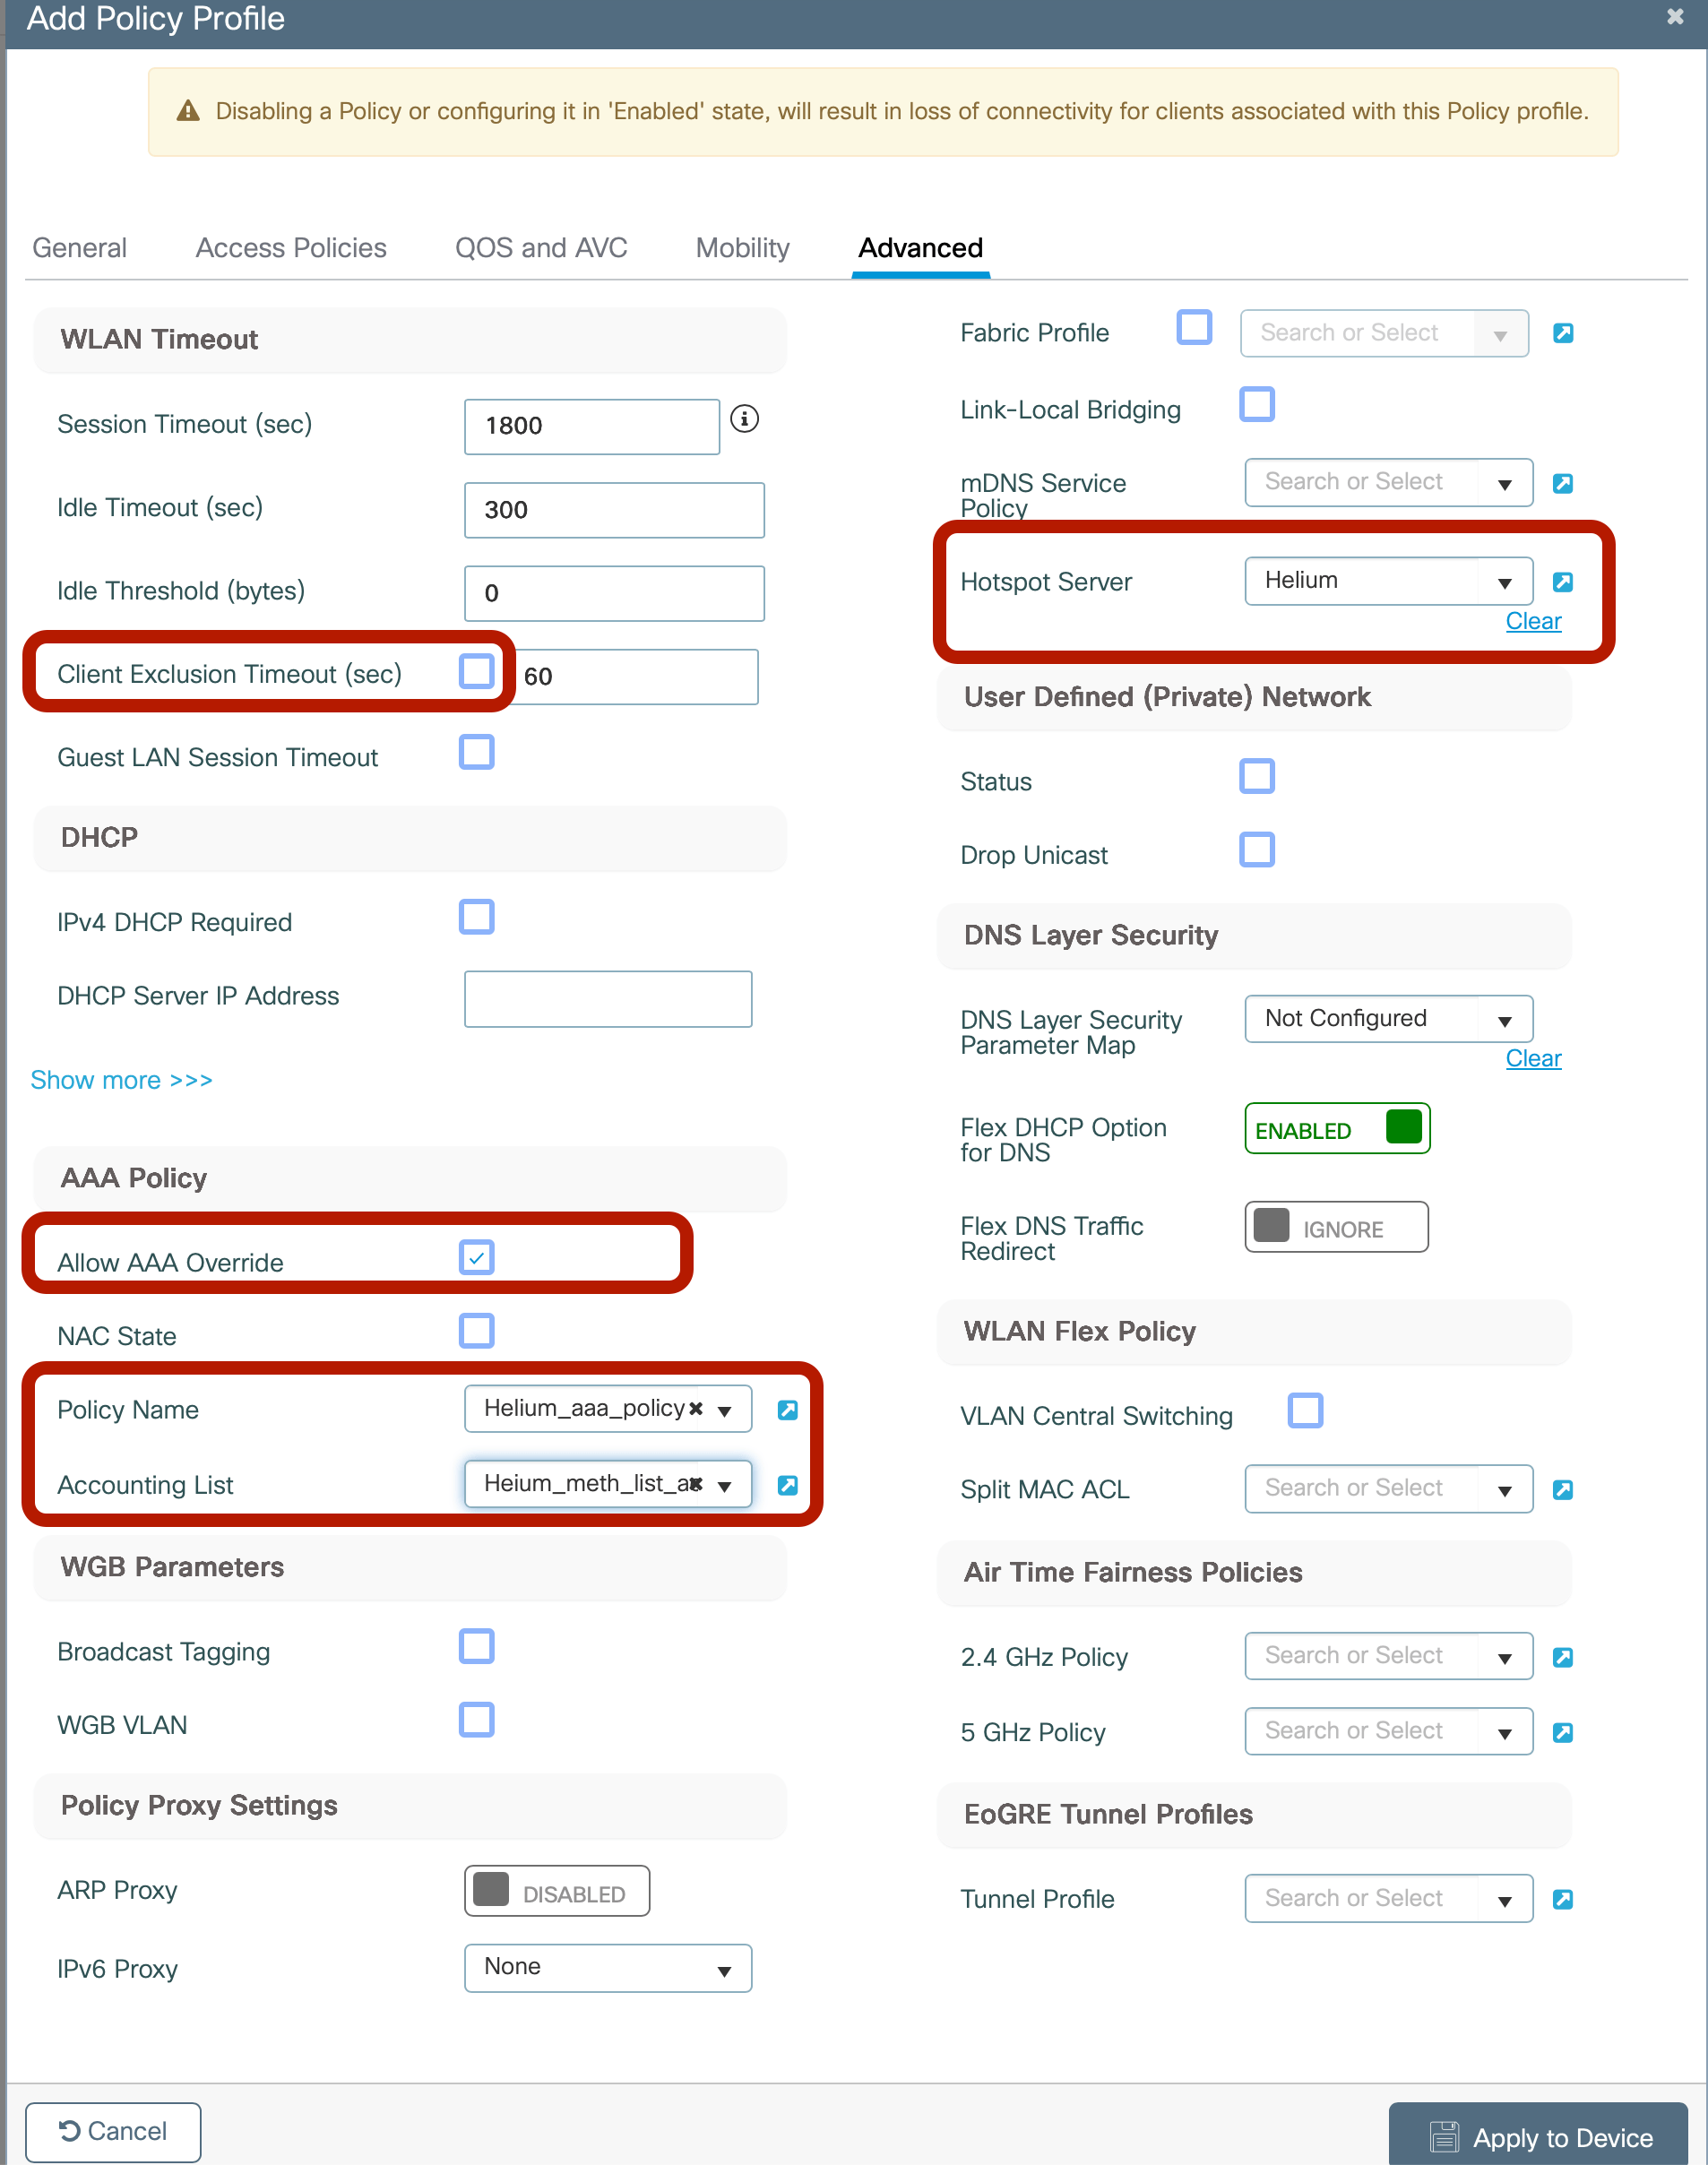
Across the top, select Advanced
-
Uncheck the box next to Client Exclusion Timeout
-
In the Hotspot Server drop-down select Helium
-
Check the box for Allow AAA Override
-
In the Policy Name drop-down select Helium_aaa_policy
-
In the Accounting List drop-down select Helium_meth_list_acct
-
Click Apply to Device
Create Policy Tag
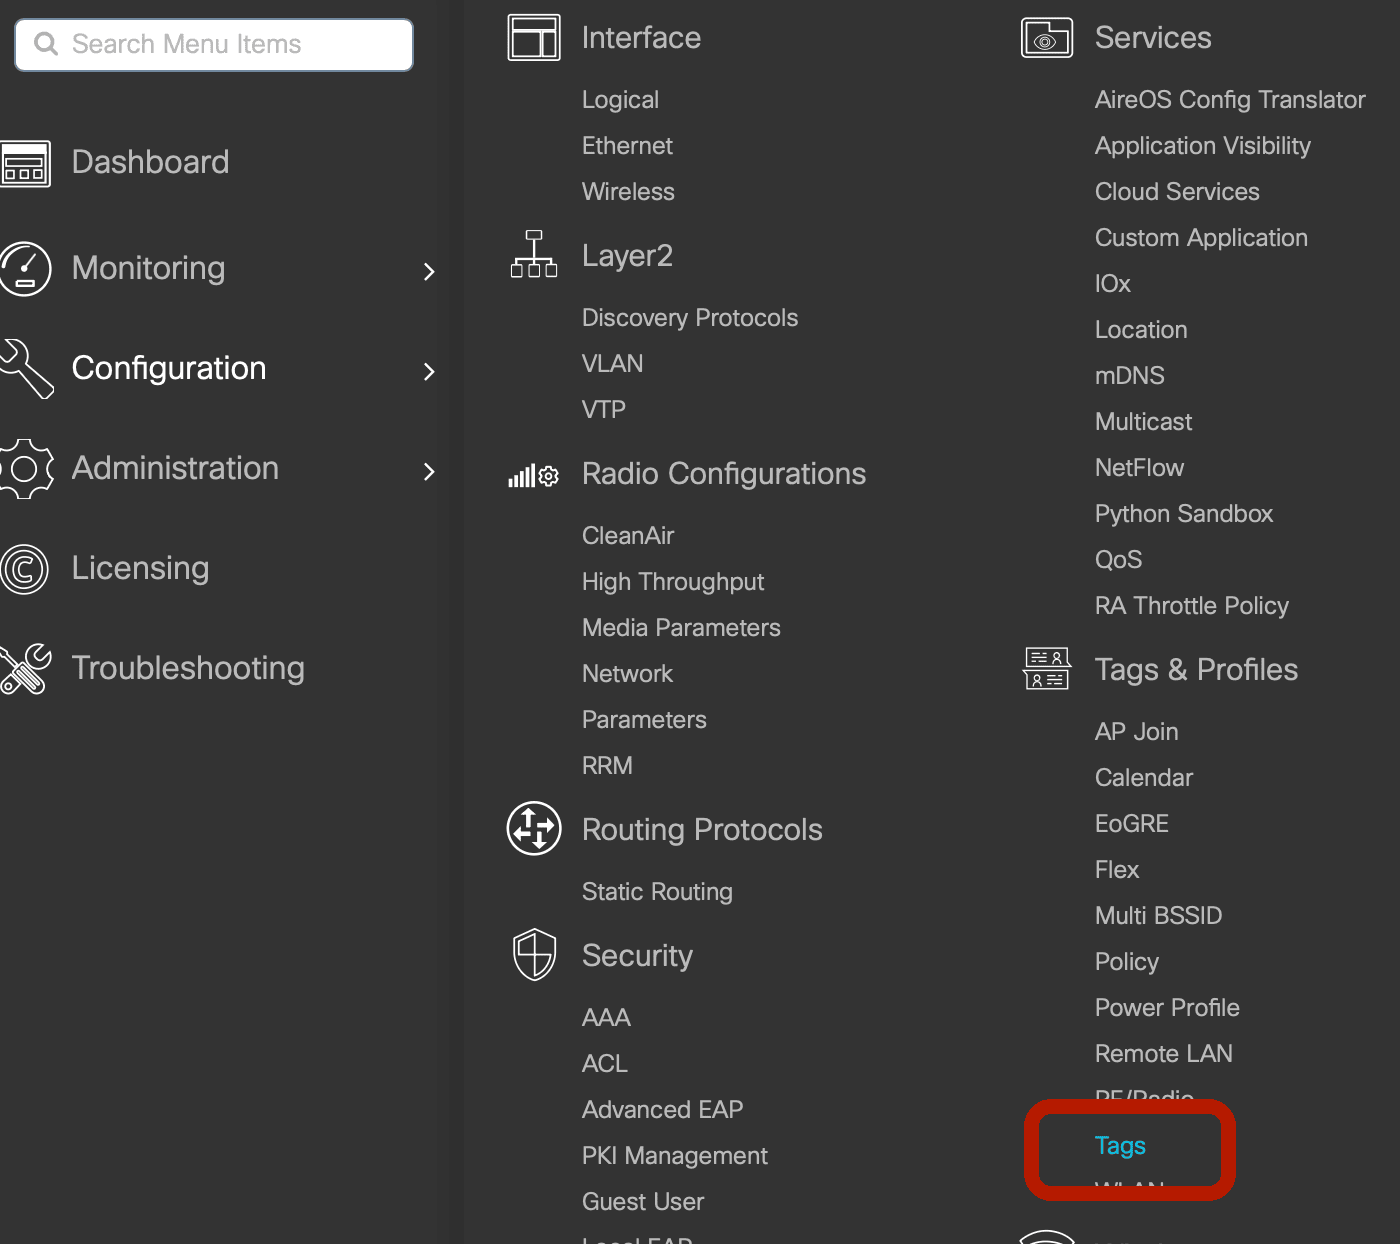
- Click on Configuration -> Tags & Profiles -> Tags
- Enter Name as Helium
- Enter Description as Helium
- Click +Add below WLAN-POLICY
- In both WLAN Profile and Policy Profile drop-down menus select Helium
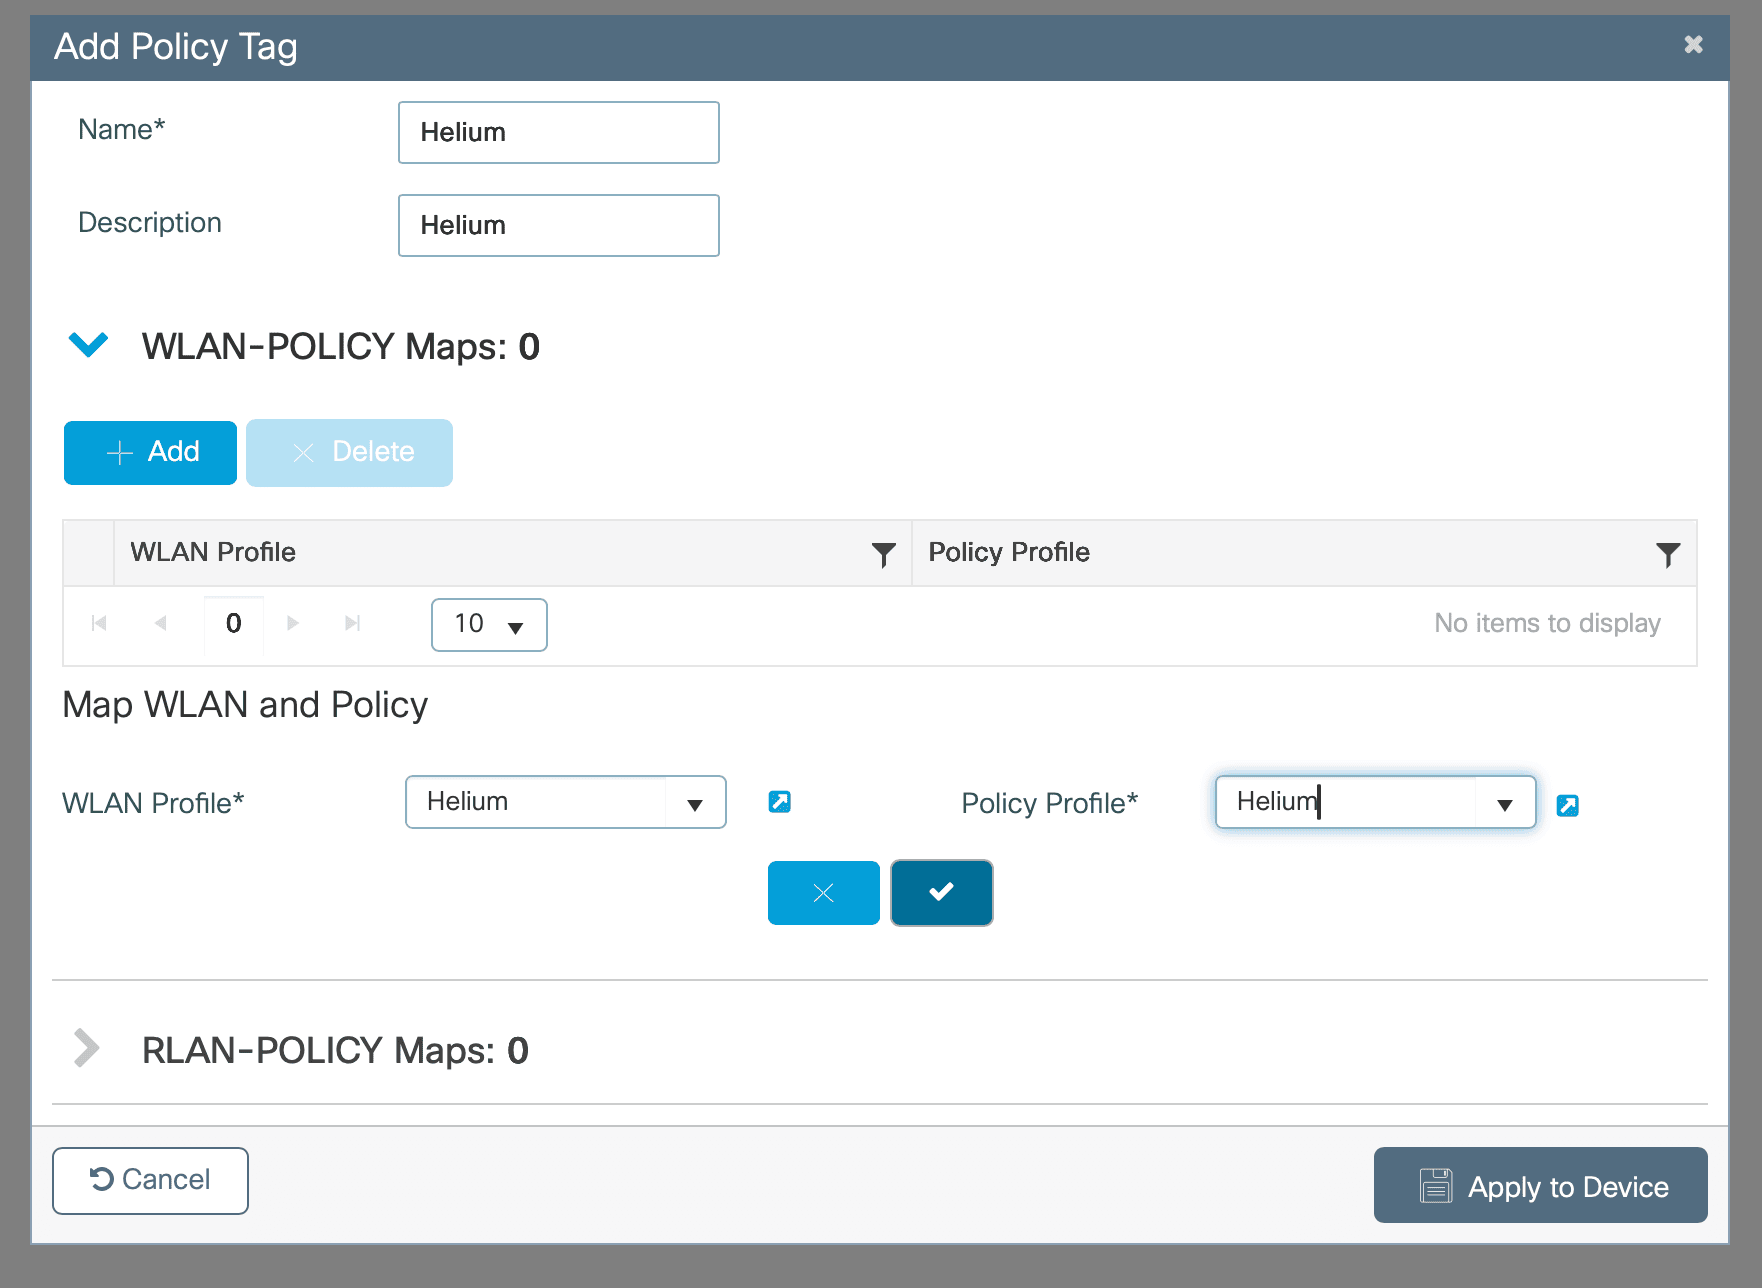
- Click the checkmark
- Click Apply to Device
Apply Helium Tag to AP(s)
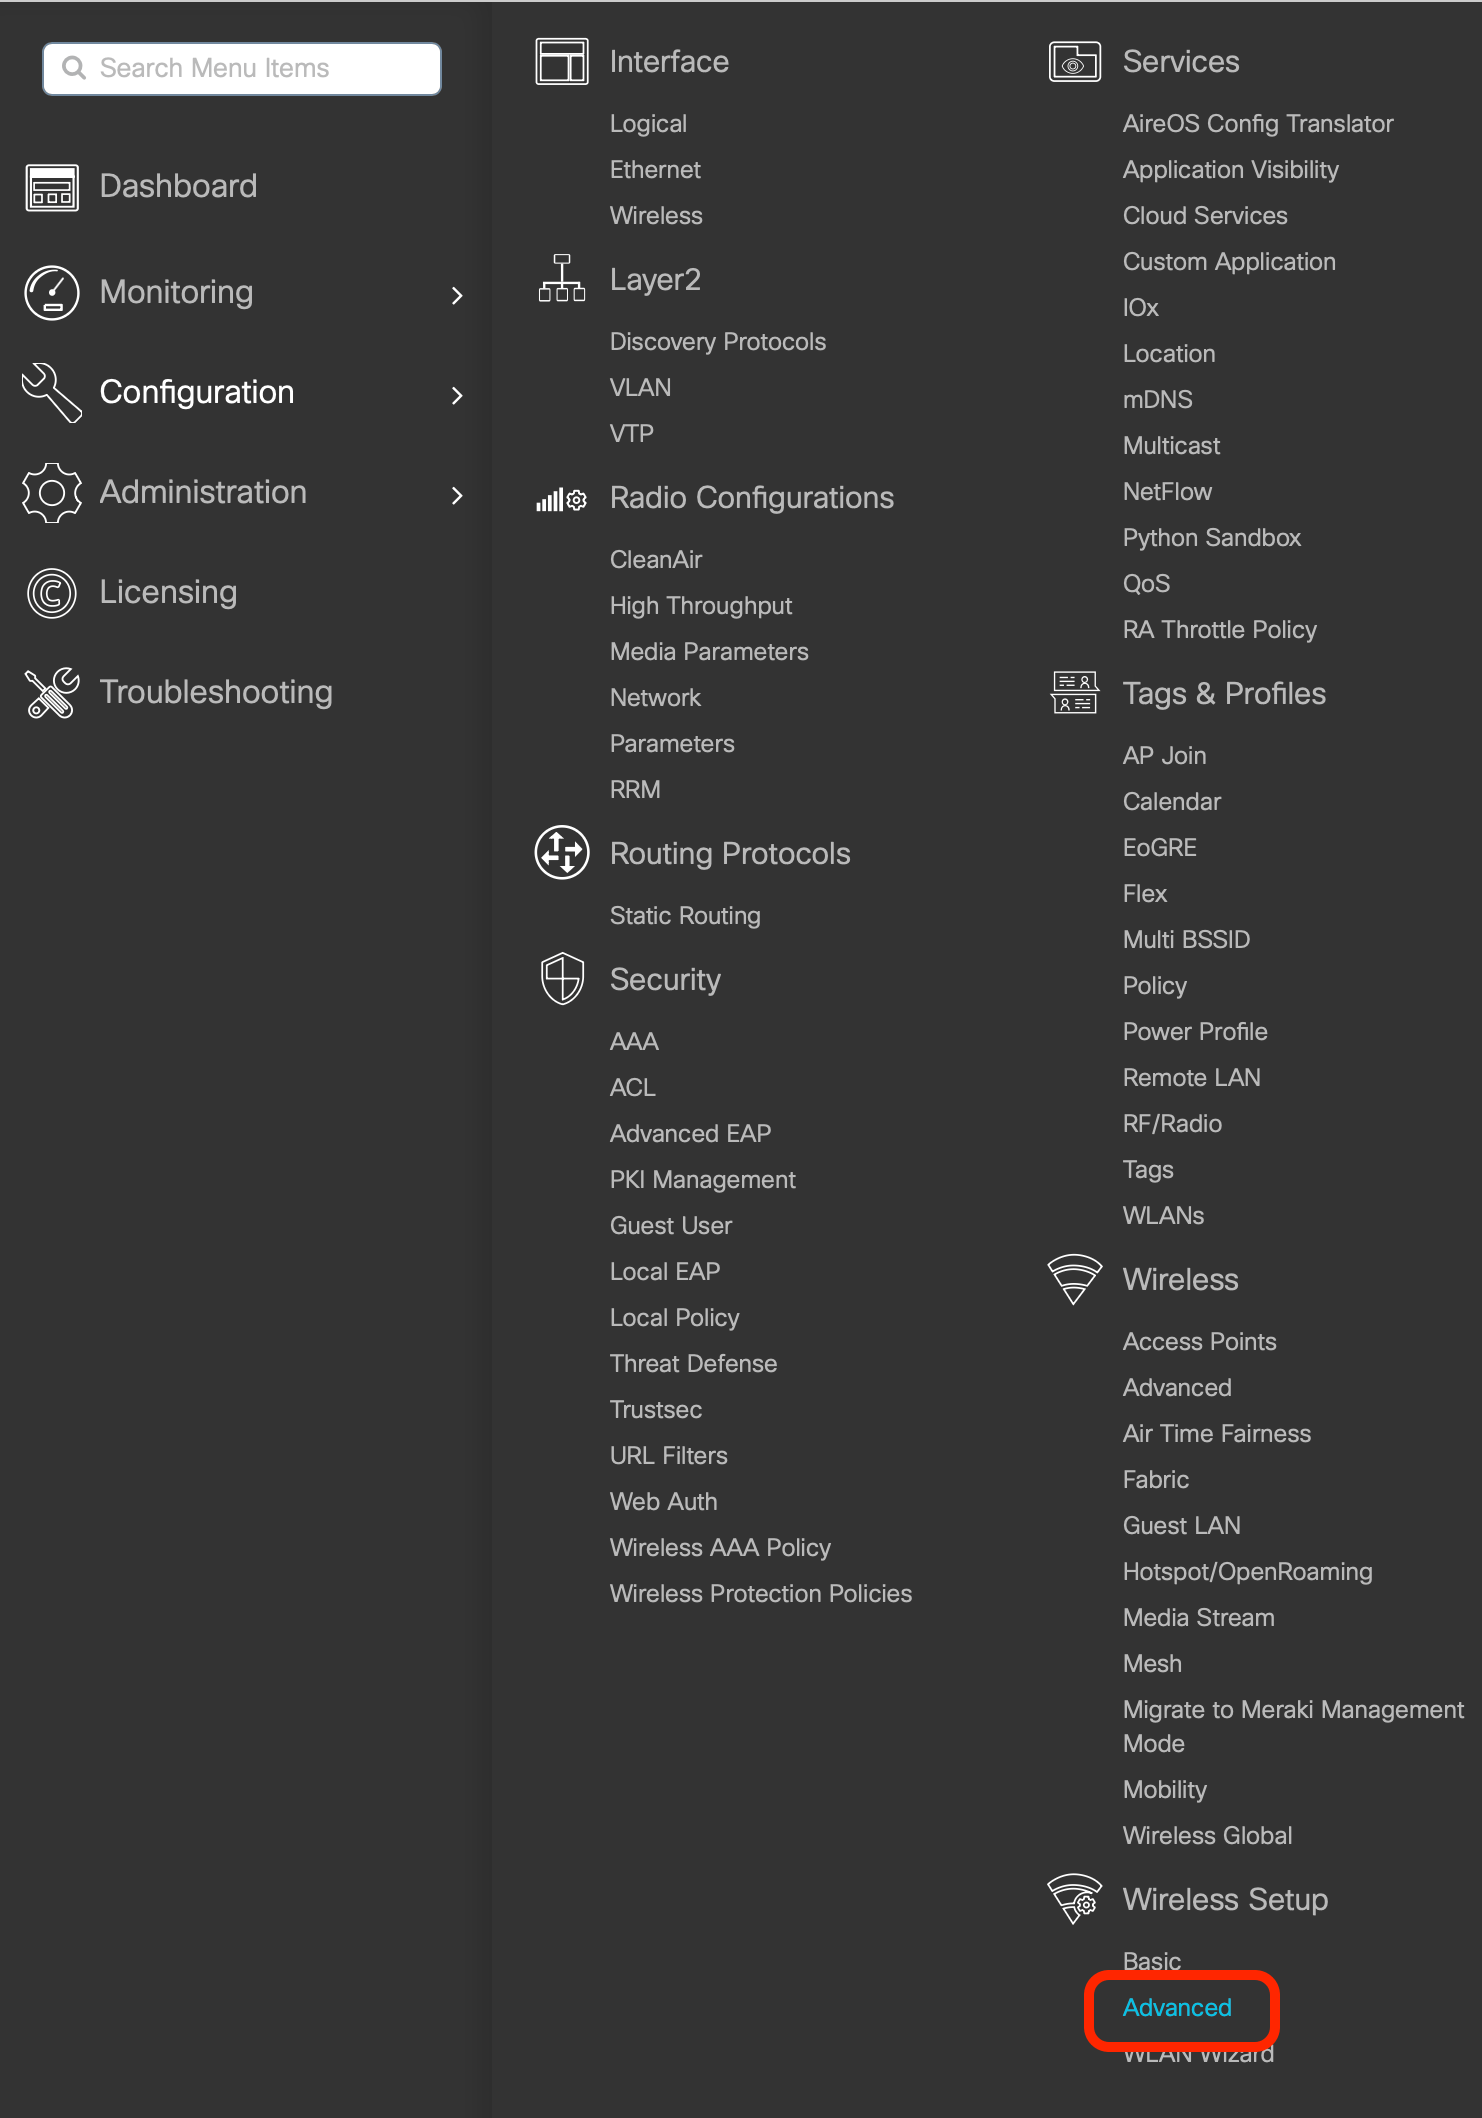
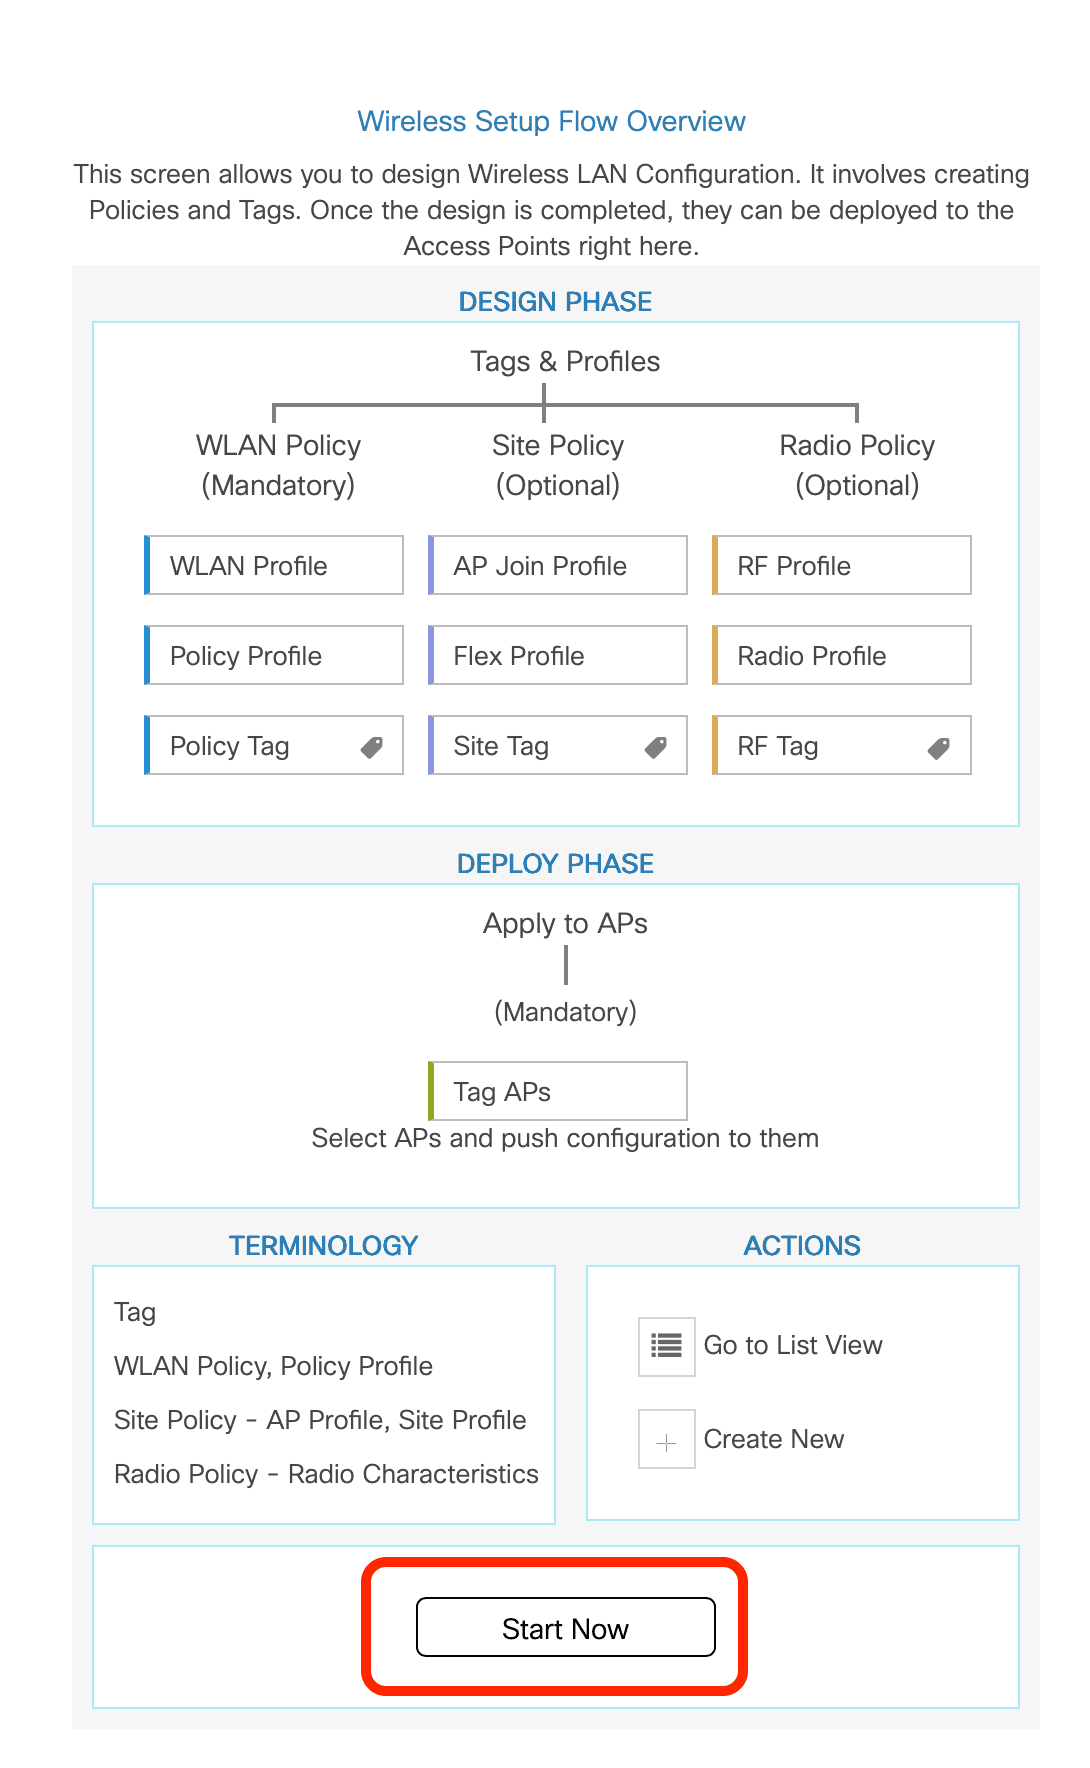
- Click on Configuration -> Wireless Setup -> Advanced
- Click on Start Now
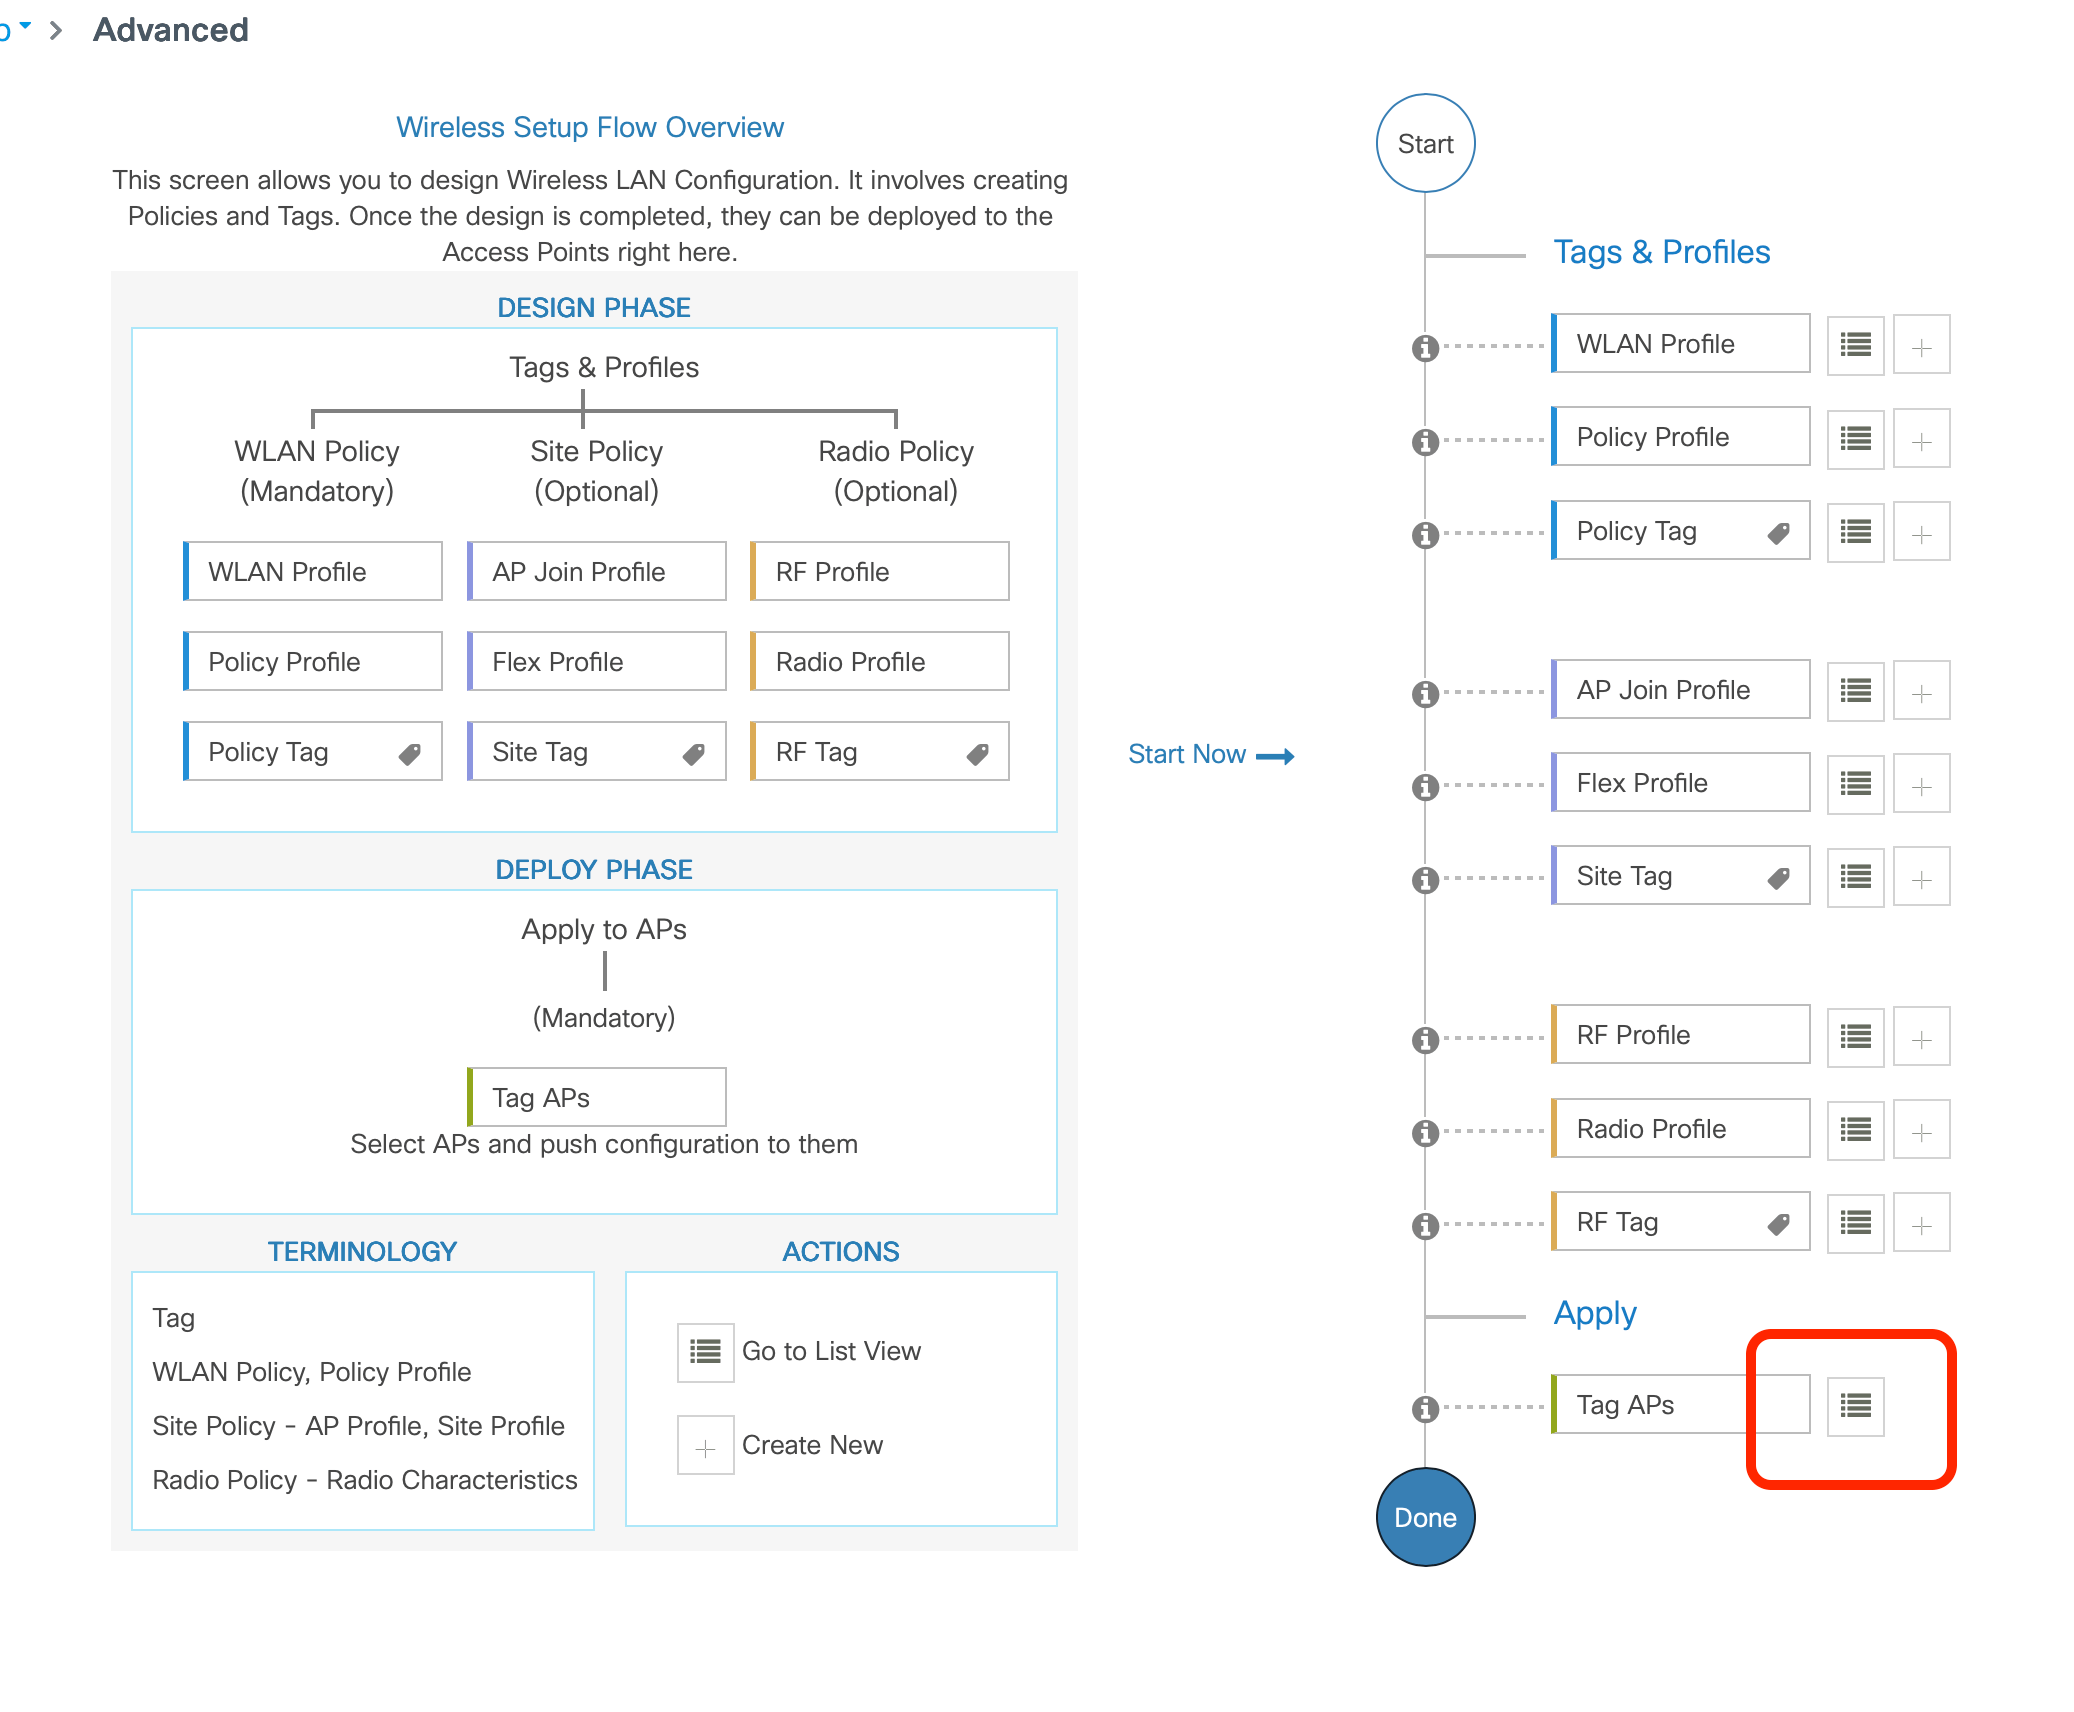
- Click on the selector box next to Tag APs in the bottom right
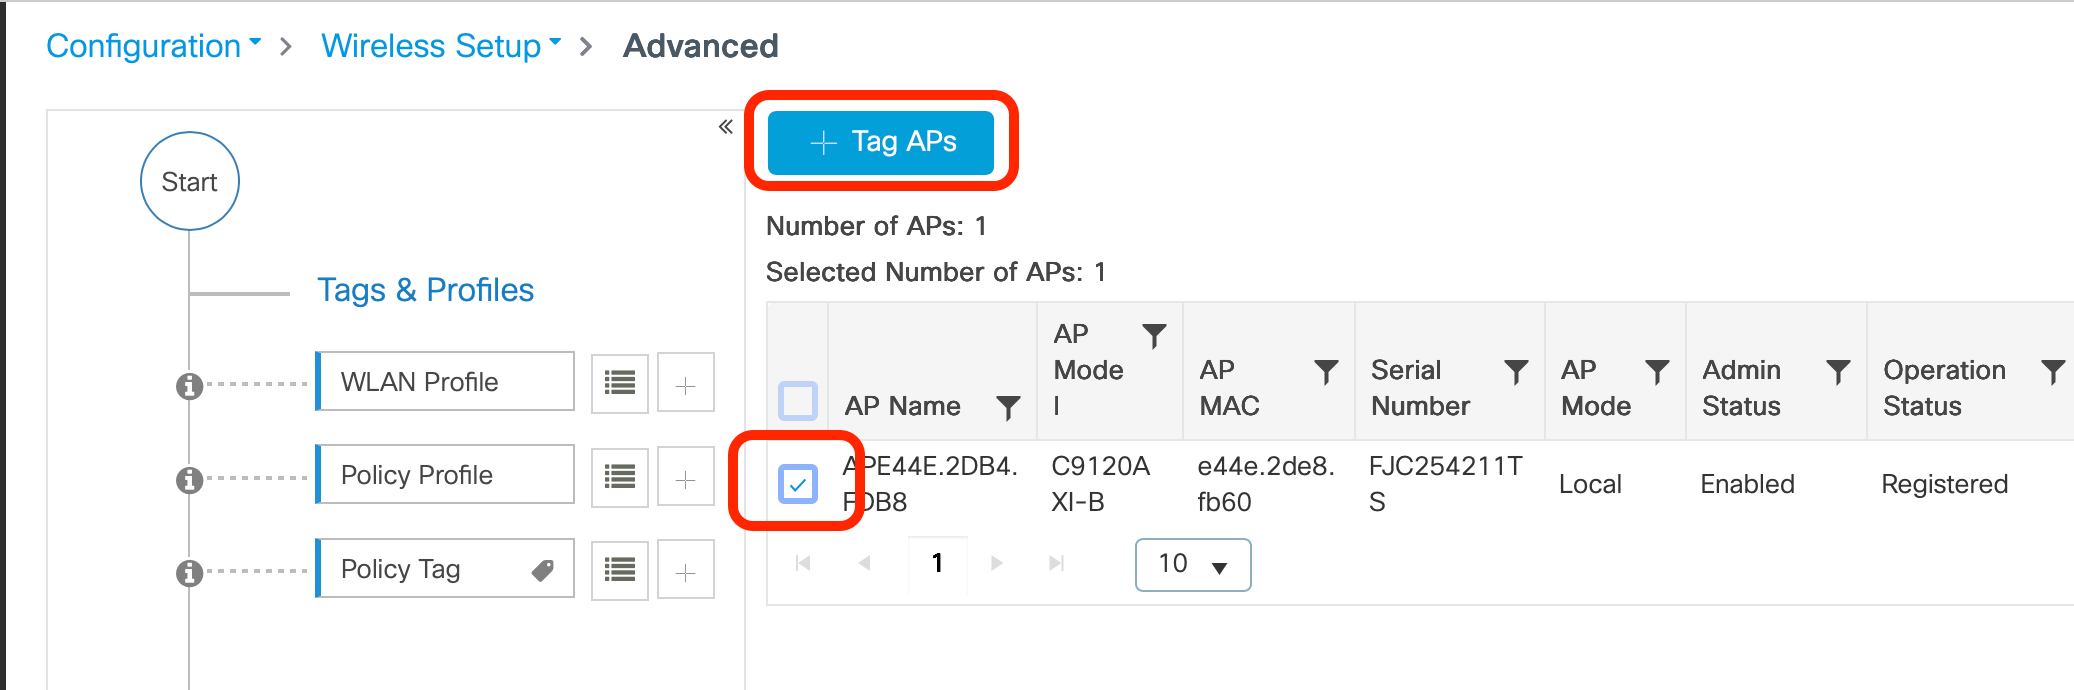
- Check the box next to the APs you want to broadcast the Helium SSID
- Click +Add when you have your APs selected
- In the Policy drop-down select Helium
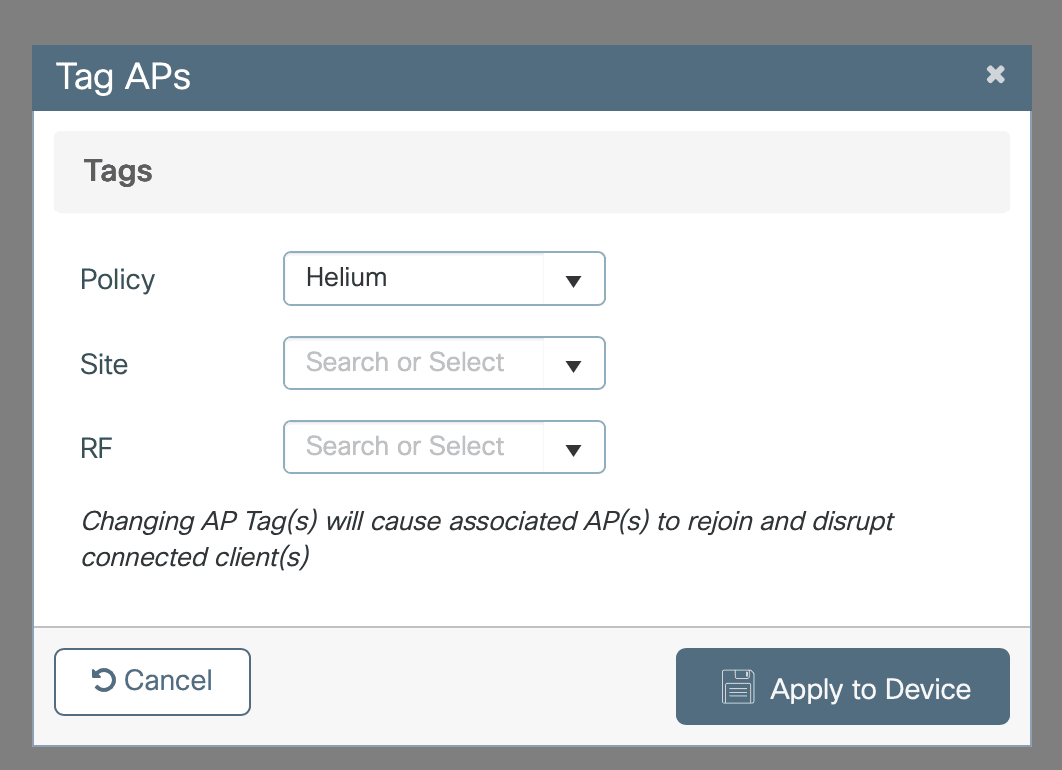
- Click Apply to Device